10 May 2023
Martin Raynsford

Rainbow Puzzle Box
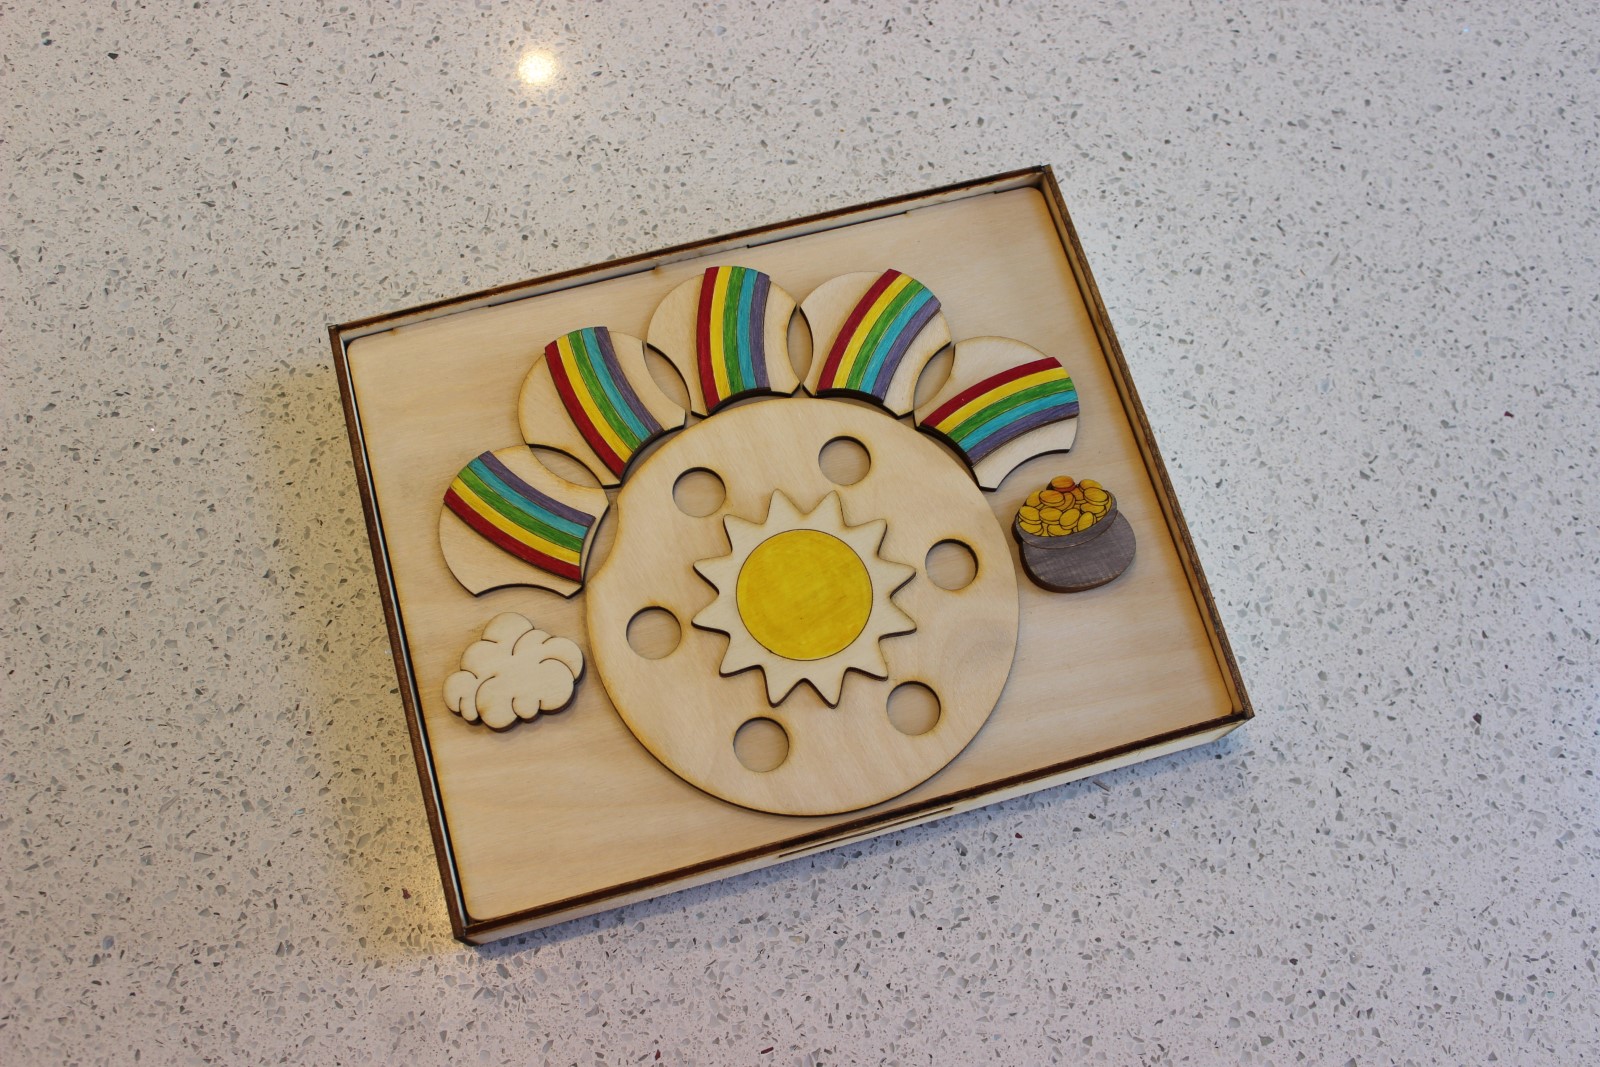
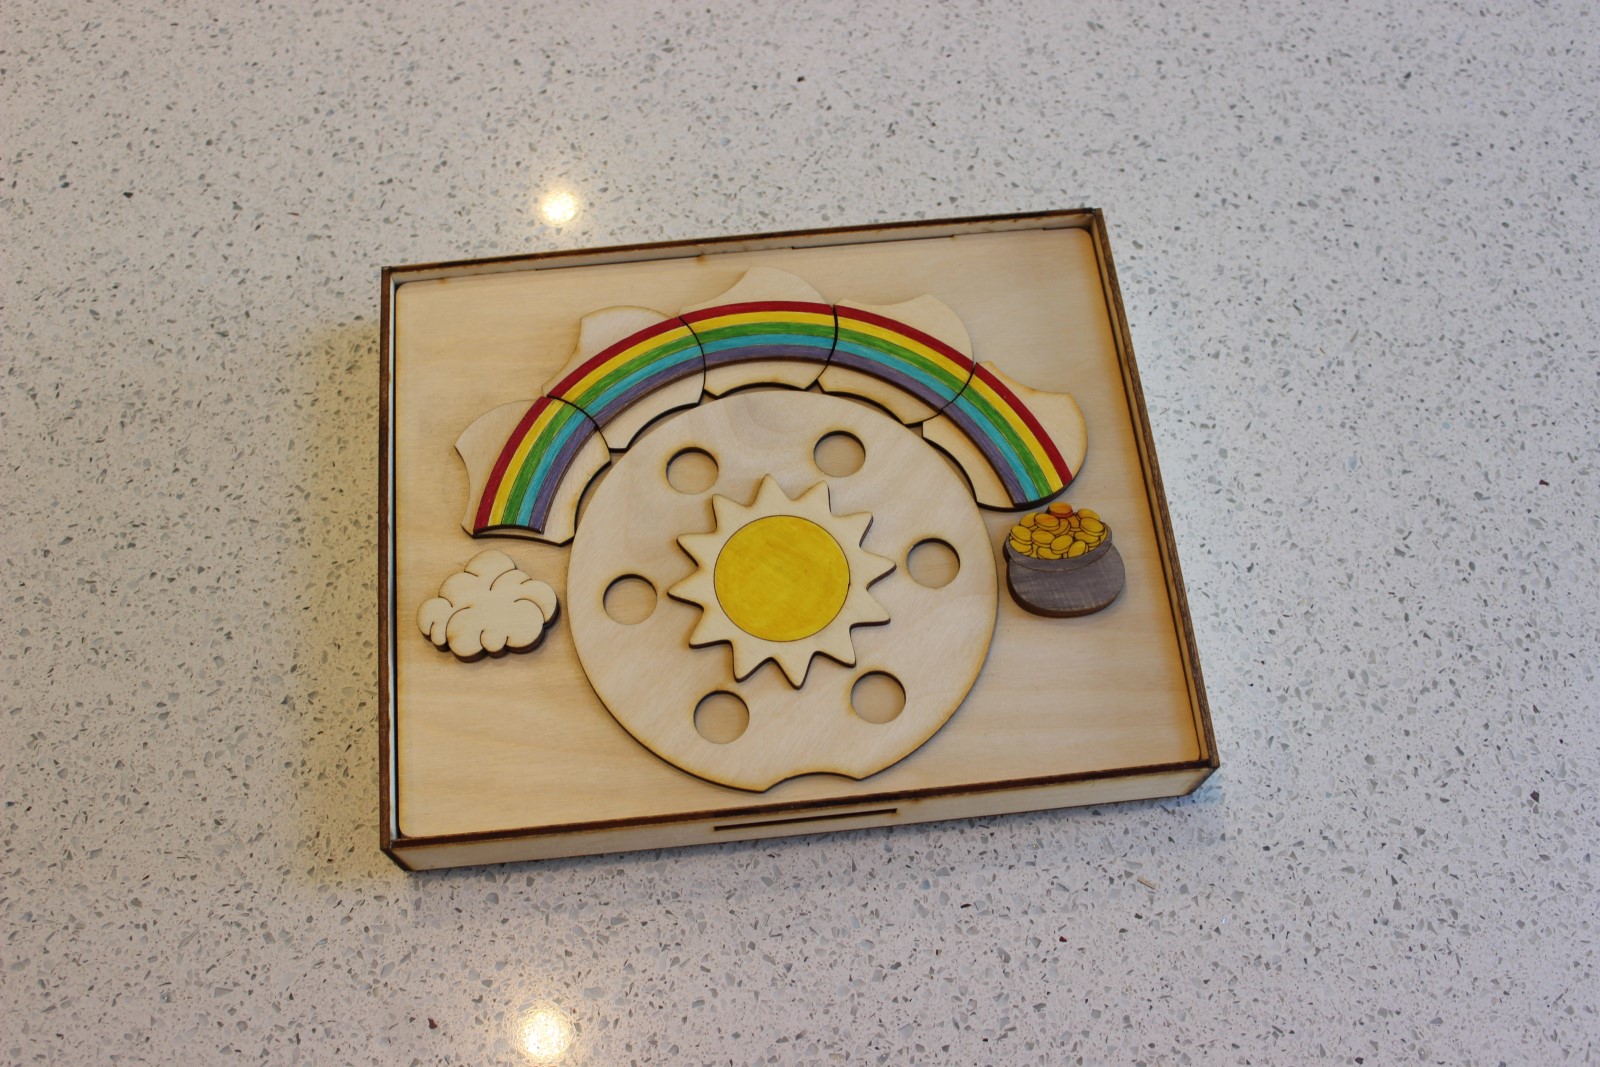
Once all the disks are aligned into the full rainbow the large wheel is completely free to rotate and can be turned to the edge of the box and allows the lid to be removed.


by noreply@blogger.com (MSRaynsford) at 10 May 2023 11:33 AM
09 May 2023
Martin Raynsford
Pinball Clock
 |
| The time is 12:10 and 31 seconds |


The device was programmed Arduino environment using several existing libraries. (source code here)
The ESP8266WiFi library allows the device to connect to an existing wifi network.
I used the core time library for the ESP8266 because it provides a method for connecting to the Network Time Protocol. This allows the device to retrieve the correct time from the internet but more specifically if allows you to compensate for British summer time, this means it should move back and forward as required over the summer.
The U8glib library is a graphics library for monochrome displays, it provides all the useful functions for writing fonts and graphic items to the display.
Finally I use the FastLED library because it has an incredibly easy to use macro function that is called at specific time intervals. No messing around with blocking delays or the millis() function.
Once initialised the main loop of the program simply checks on the time and updates the display at one second intervals. The majority of the code for this program is about setting up the Wifi and NTP server and confirming that they are connected before progressing to the main loop.
by noreply@blogger.com (MSRaynsford) at 09 May 2023 01:07 PM
07 May 2023
Martin Raynsford
All Aboard


by noreply@blogger.com (MSRaynsford) at 07 May 2023 10:41 PM
02 May 2023
Martin Raynsford
Workshop Progression
Tomorrow, for the first time since we moved into the new house four and a half weeks ago, both children are going to be in school at the same time and I actually have to do some work in my new workshop. I thought I had prepared enough stock to last a few months but it turns out all of that sold pretty quickly and now I need to spend some time making new boxes.

I actually cut a lot of parts for Antikythera Tablets before we left the old house so it's mostly just an assembly job but I needed a space to work on (I'm no longer allowed to take parts into the house for assembly :D ). I cleared down one of the benches and had a good tidy of everything else. It's still the same junk just better organised. In particular I now have a packing bench for all of my stock items and packaging.


by noreply@blogger.com (MSRaynsford) at 02 May 2023 09:46 PM
01 May 2023
Martin Raynsford
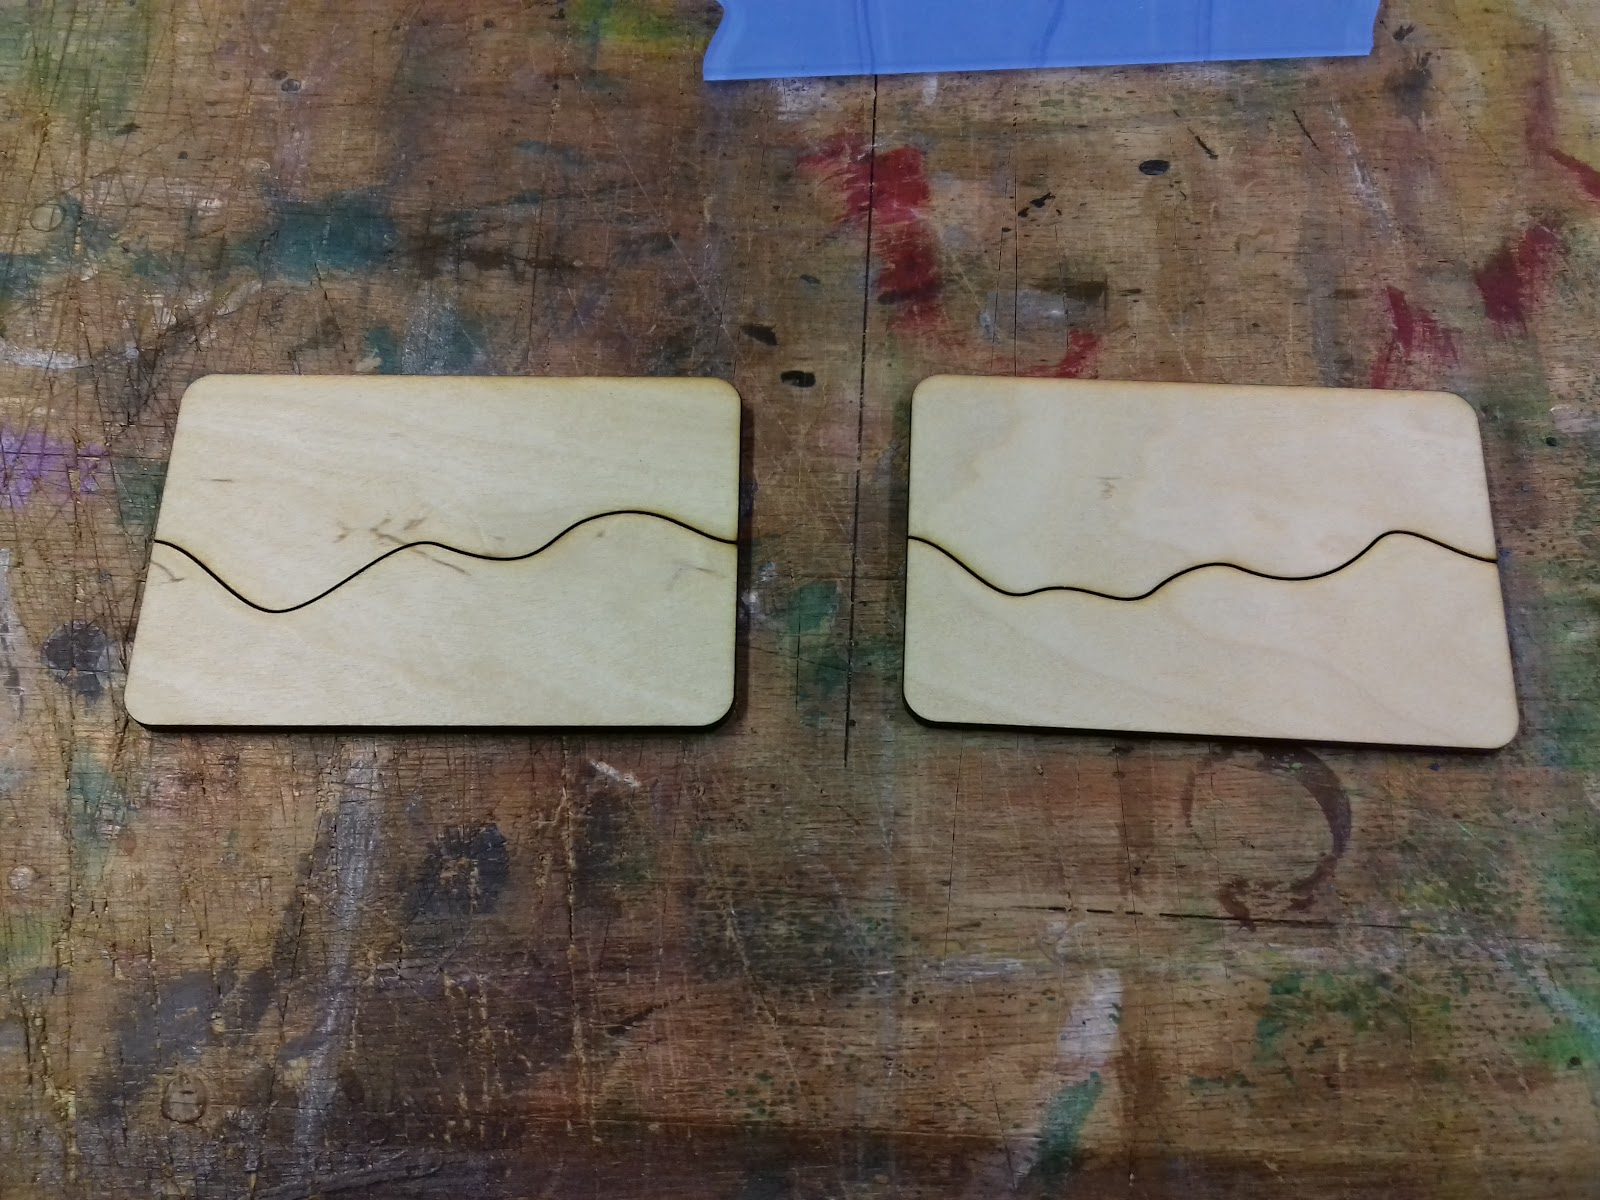
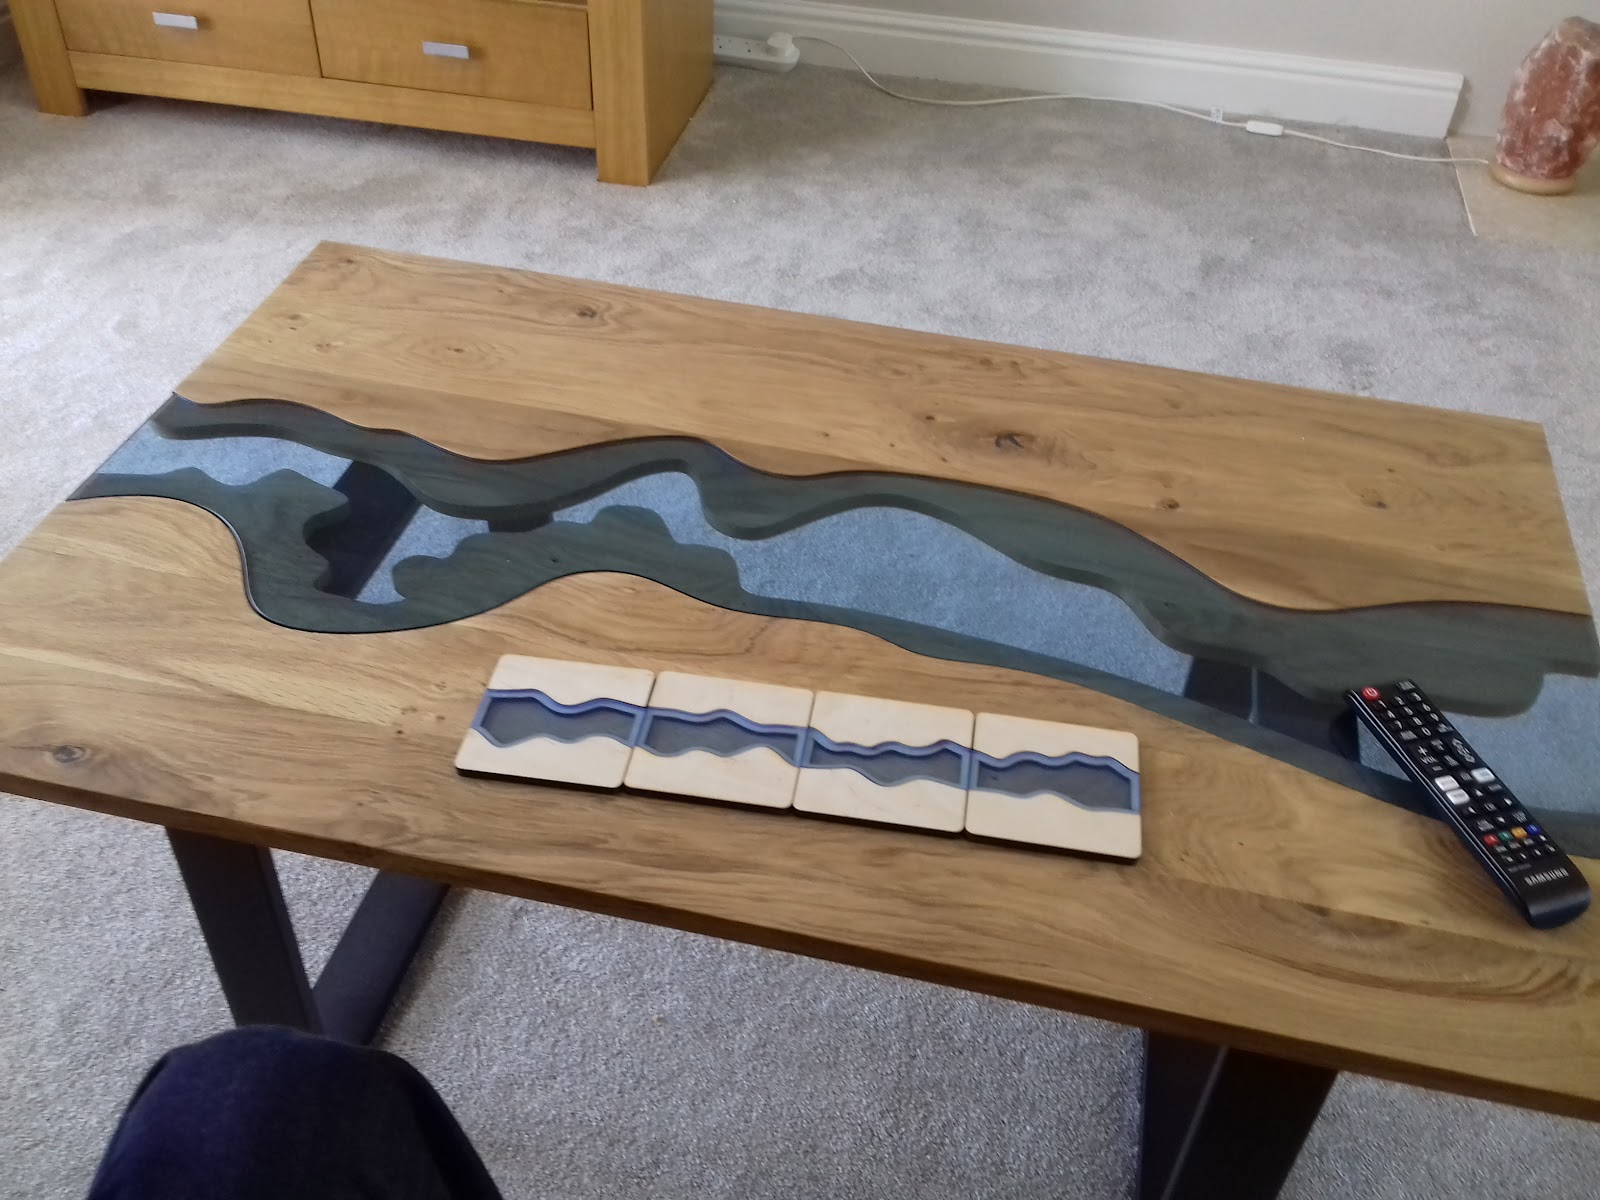
River Coaster Update

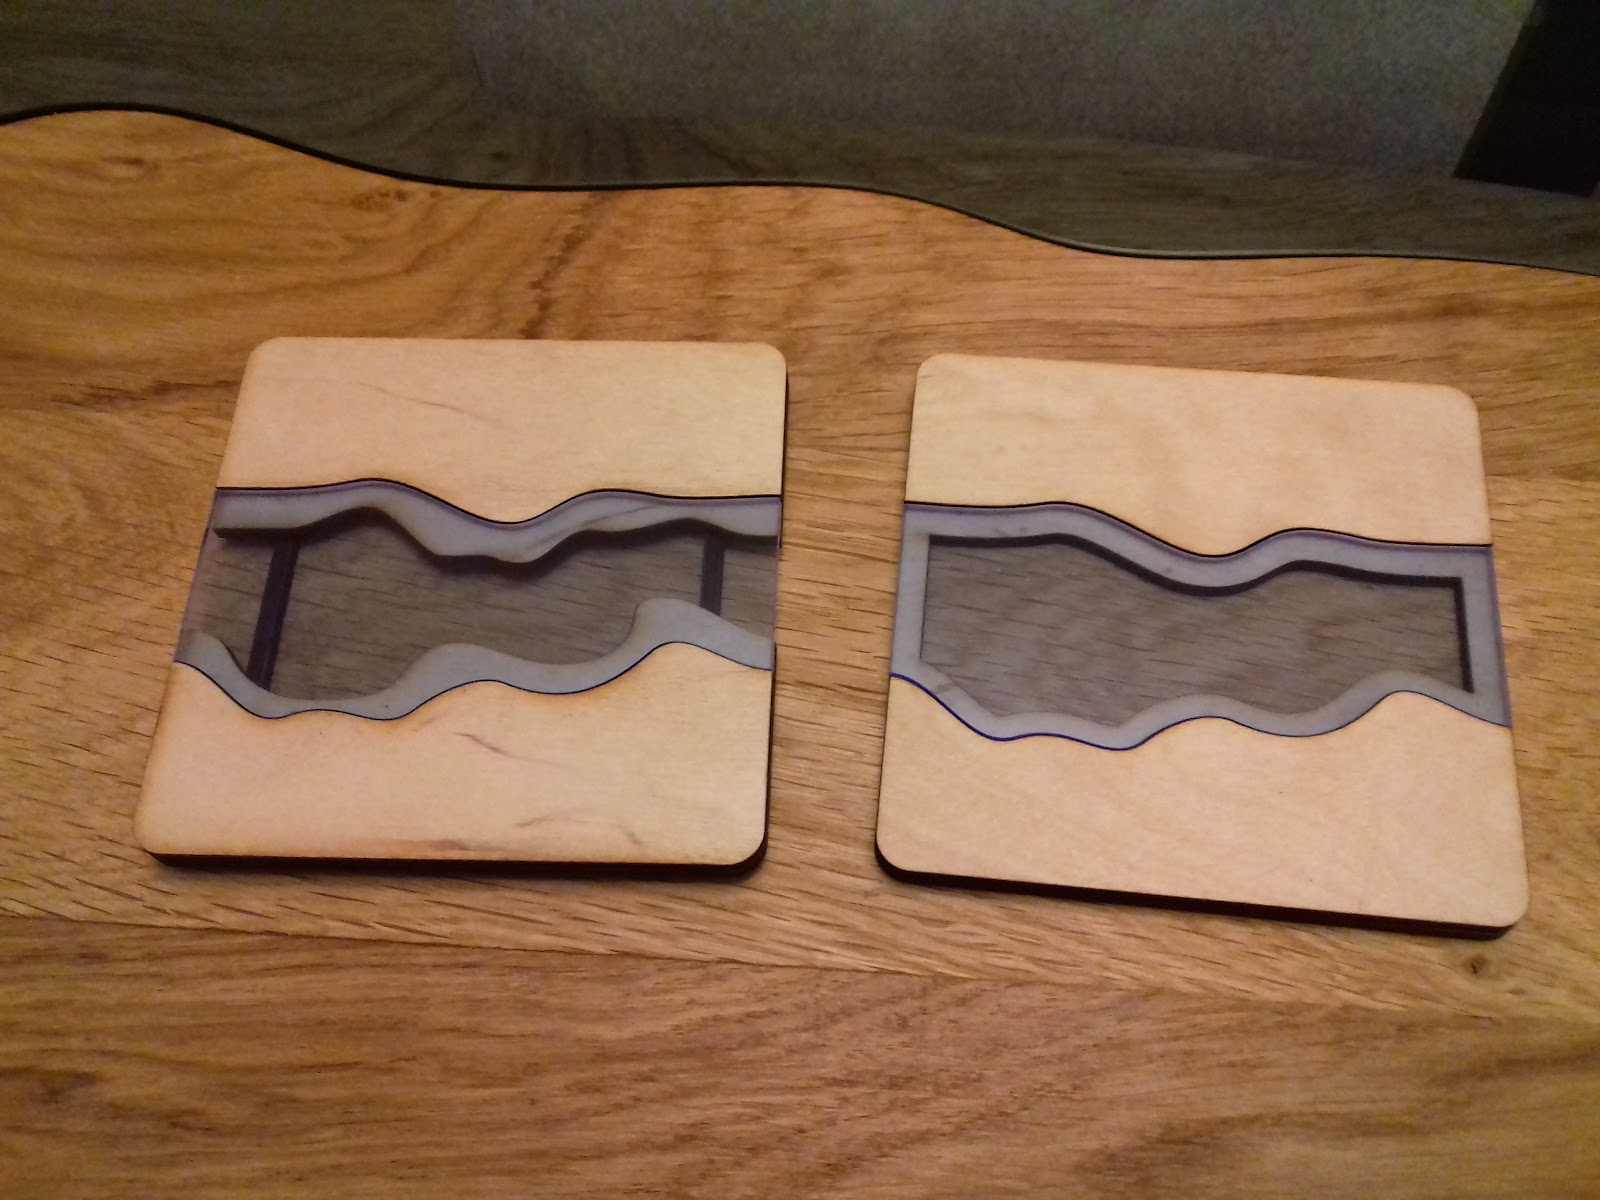
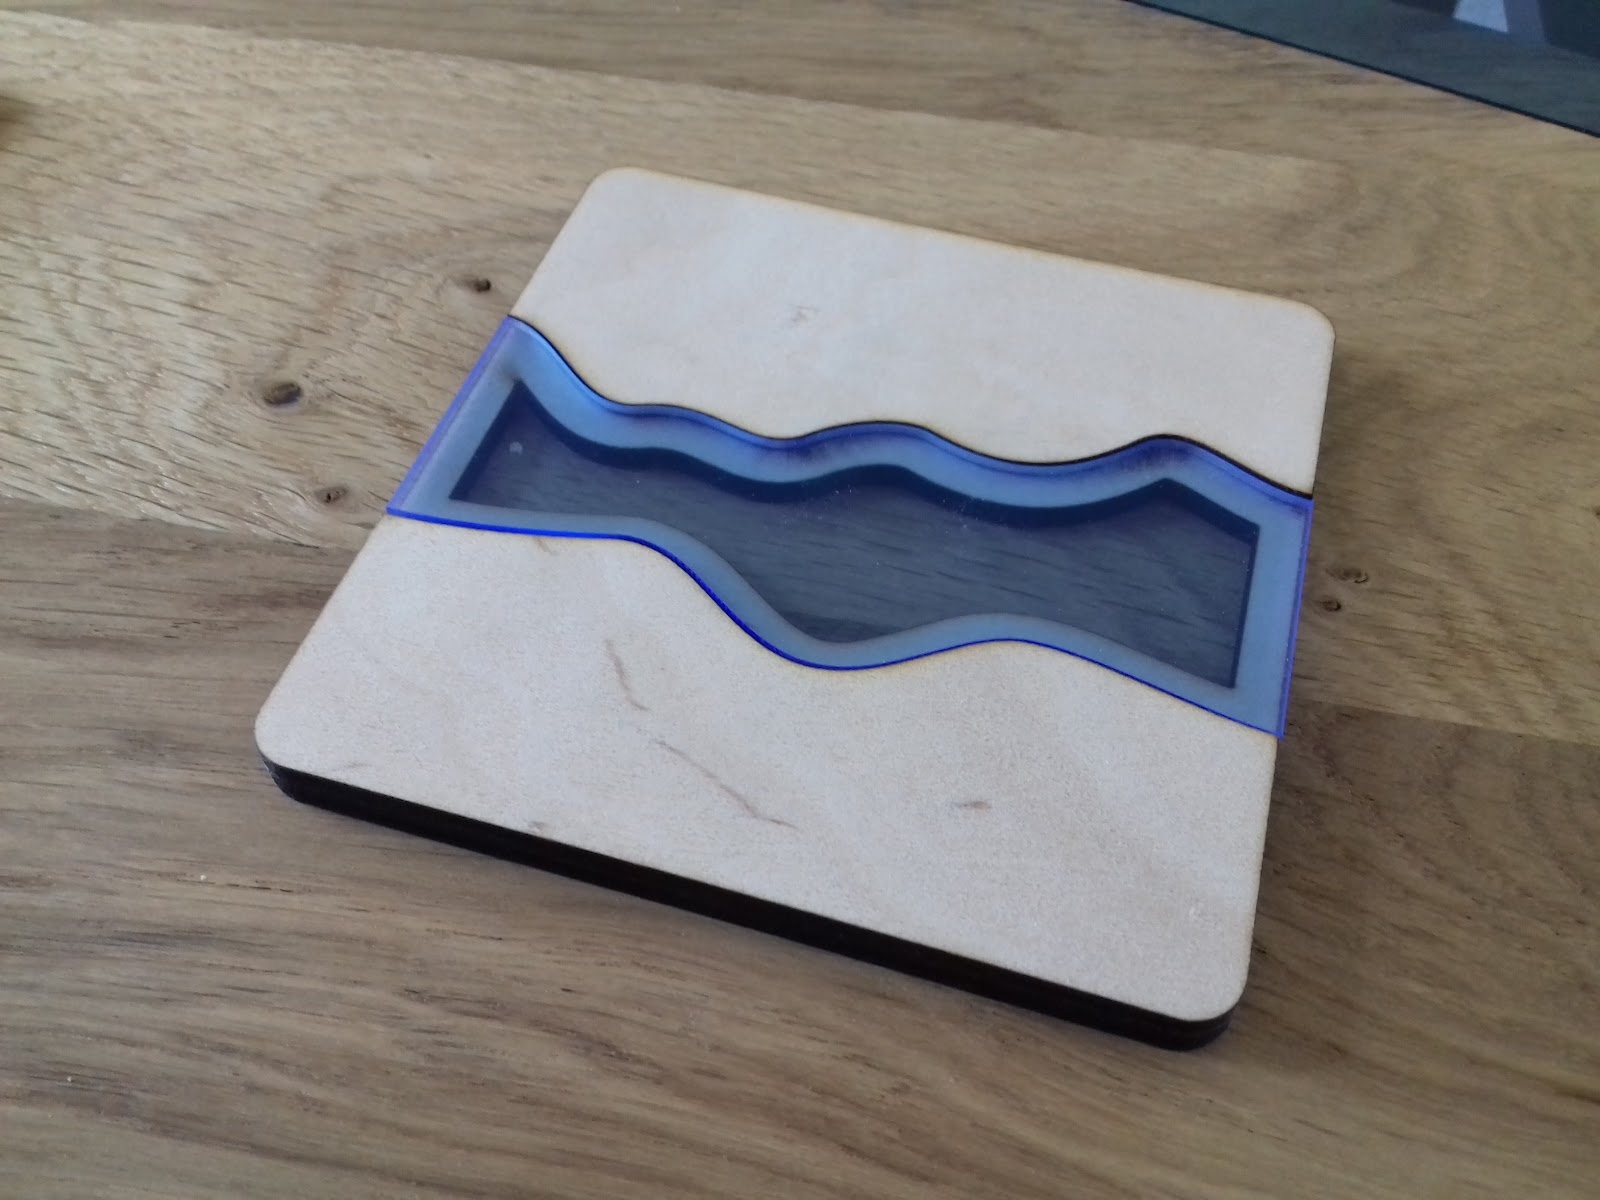
The lower layer of the river now has it's own curves that differ from the upper layer, it's a more interesting shape for the whole coaster. The upper and lower layers but start and stop in the same positions so the tiles can still be laid in any order. The lower layer tiles also share common edges to make the cutting fast and simple.


The lower layer now runs all the way to the edges which makes it look much more like a continuing river this achieved by cutting the two halves of coaster and spanning across the gap with a spar underneath the coaster. I'm using the stronger 5 Ply BR grade birch plywood which is plenty strong enough for this 3x3mm spar. The spar locates into the lower layer of the coaster which is hidden under the top layer. Just for completeness I painted the spars black which makes it even harder to see them through the river.

I'm pleased with the revamp and have included them in my files for sale over on Etsy, get the files here
by noreply@blogger.com (MSRaynsford) at 01 May 2023 10:20 PM
25 April 2023
Martin Raynsford
River Coasters
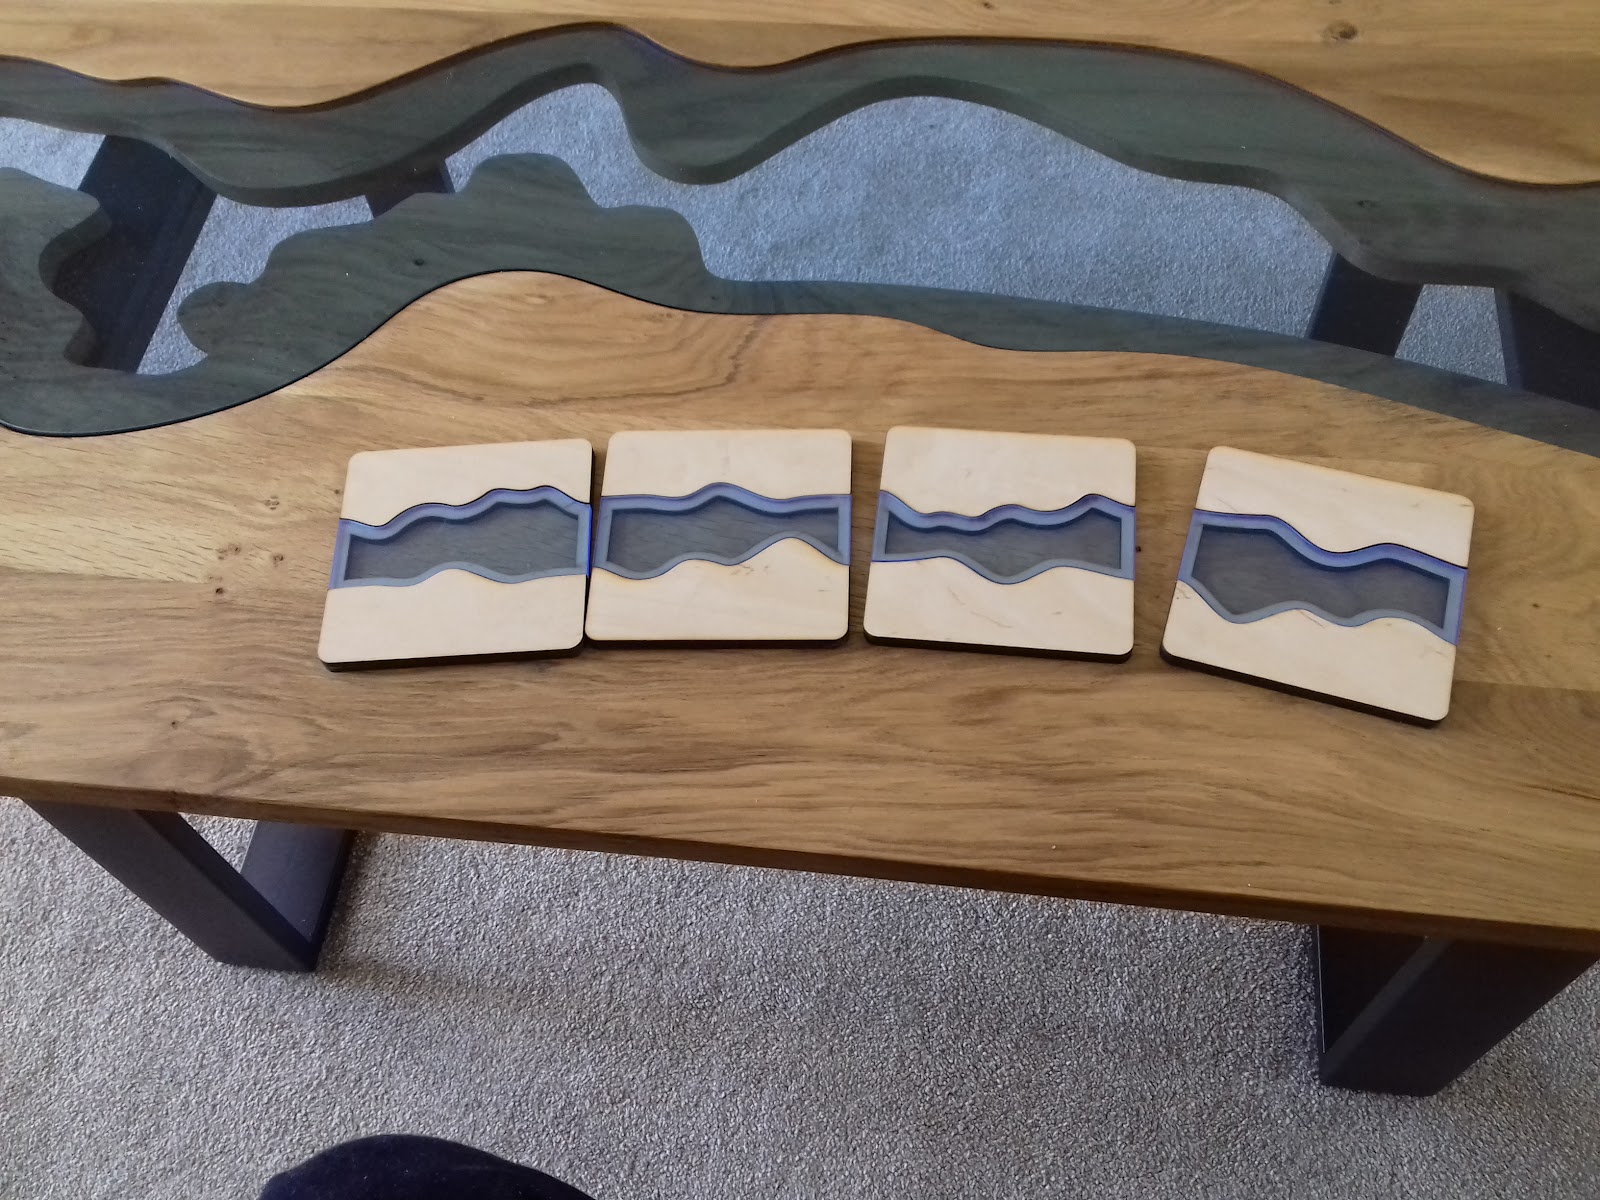
Even though I was moderately pleased with my simple coasters last week, I knew I could do something better to go with our new coffee table. Taking a design hint from the table itself, I replicated the river style in a much smaller format. I've used blue flourescent perspex several times before to give the same water effect.
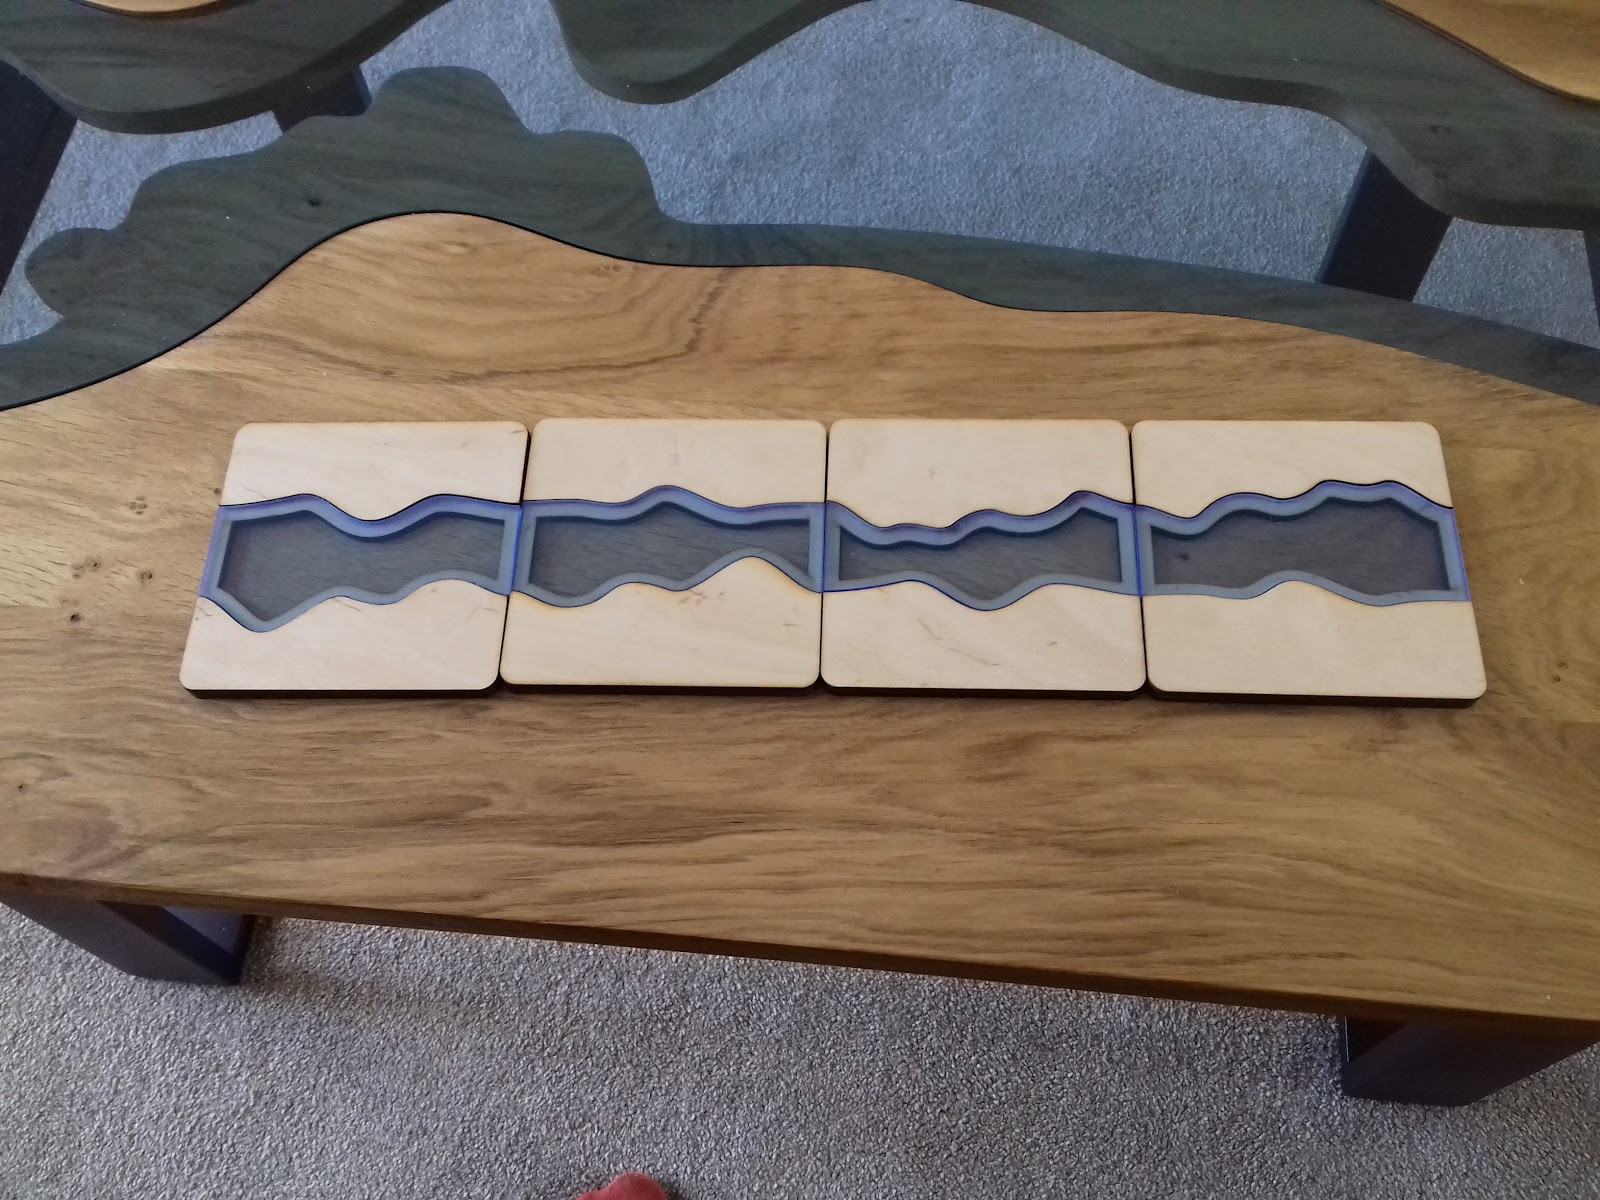
I took a second cue from my Carcasonne River Expansion, each tile aligns with all the other tiles in any combination. the river edges all meet at the same point and the same direction so which ever order they go in they'll form a nice looking river.
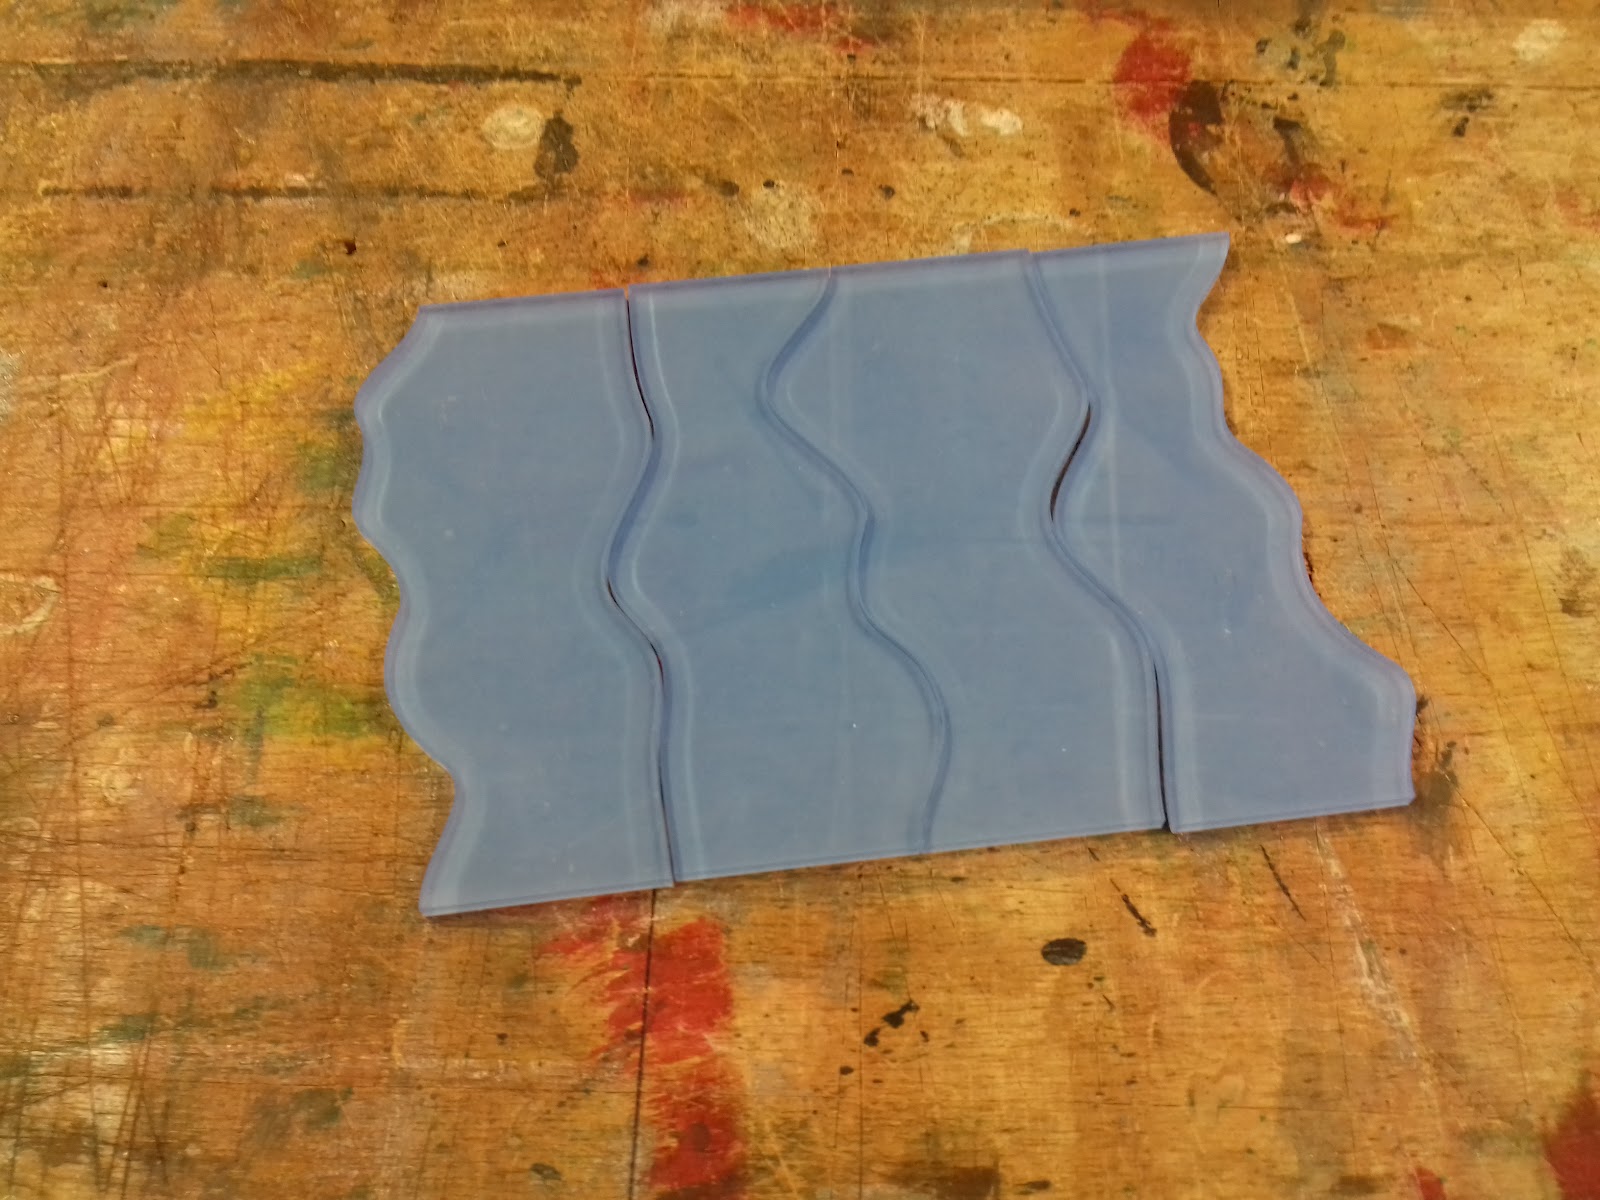
The bottom layer still had to be full size and I had to include some material between the two banks to keep the halves separated. The effect works but I keep thinking about how to do that better.
by noreply@blogger.com (MSRaynsford) at 25 April 2023 10:04 PM
22 April 2023
Martin Raynsford
Shed Complete
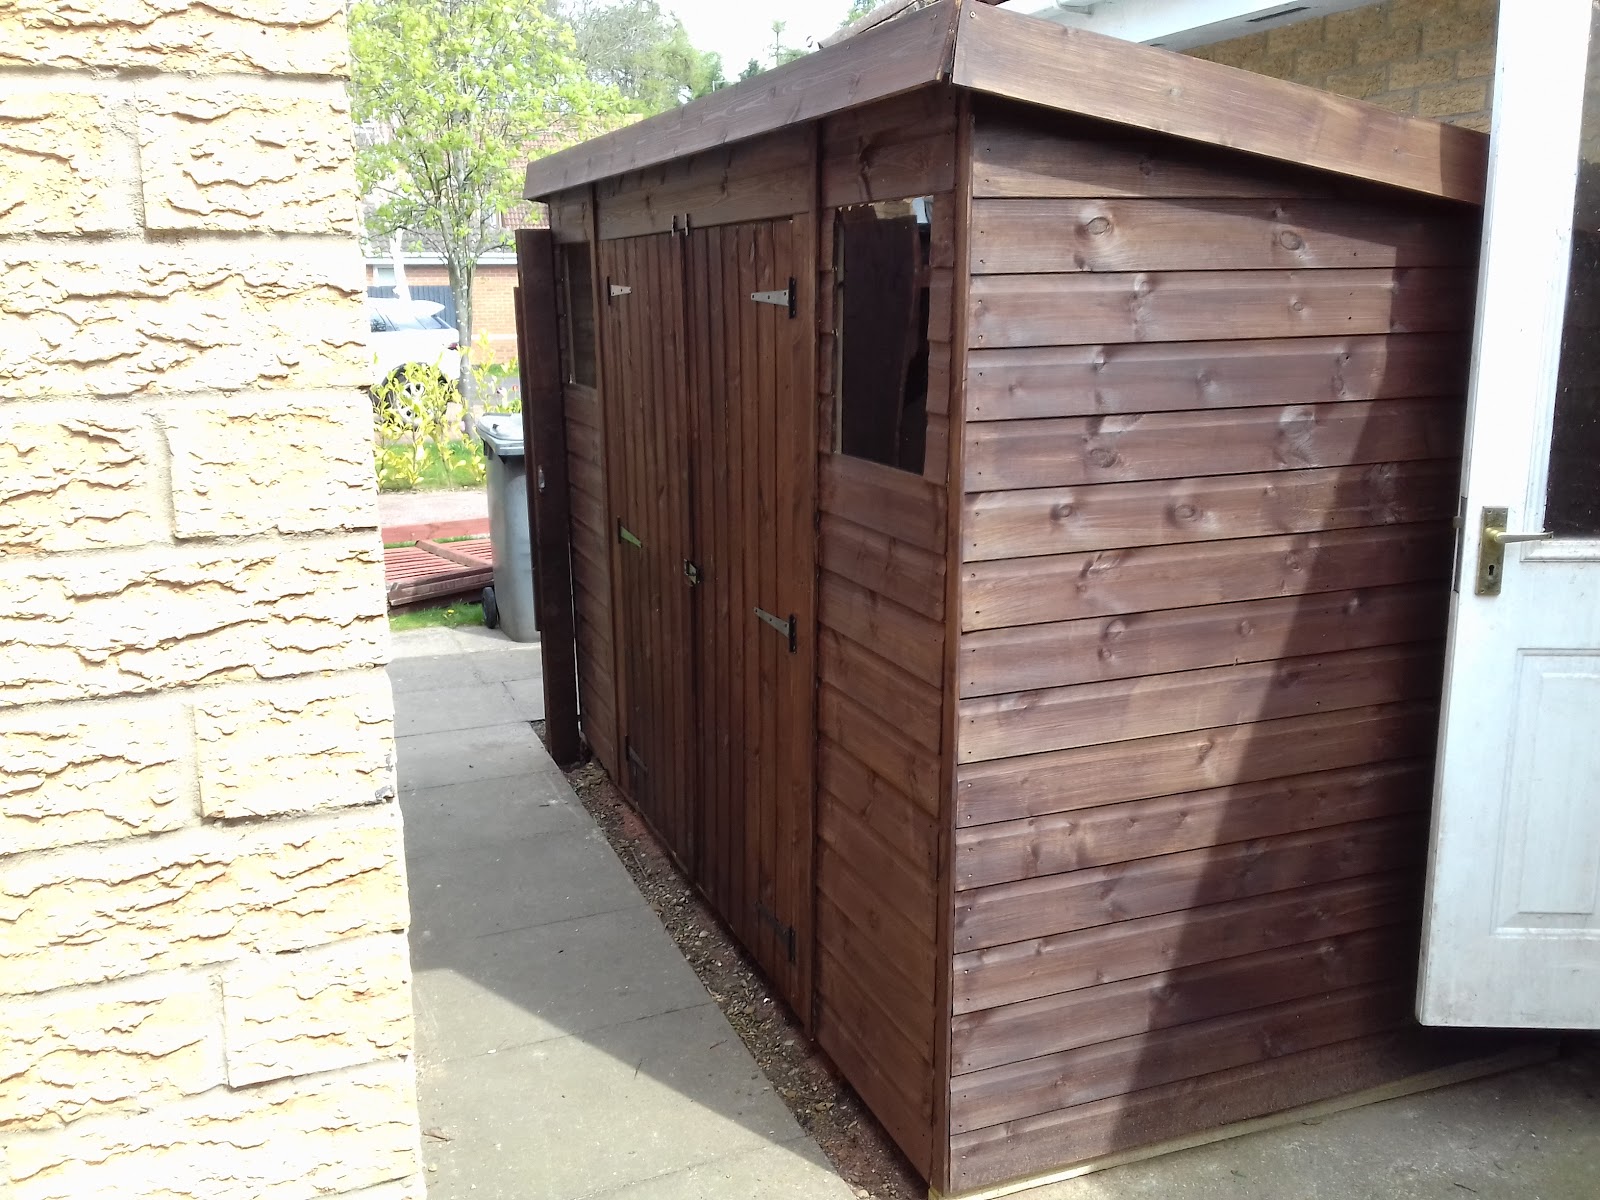
It will probably need so further adjustments when I get the laser cutter up and running again. It's my intention to vent into the gap behind the shed so that the neighbours can't hear it when it's running.


by noreply@blogger.com (MSRaynsford) at 22 April 2023 07:50 PM
18 April 2023
Martin Raynsford
Simple Coasters
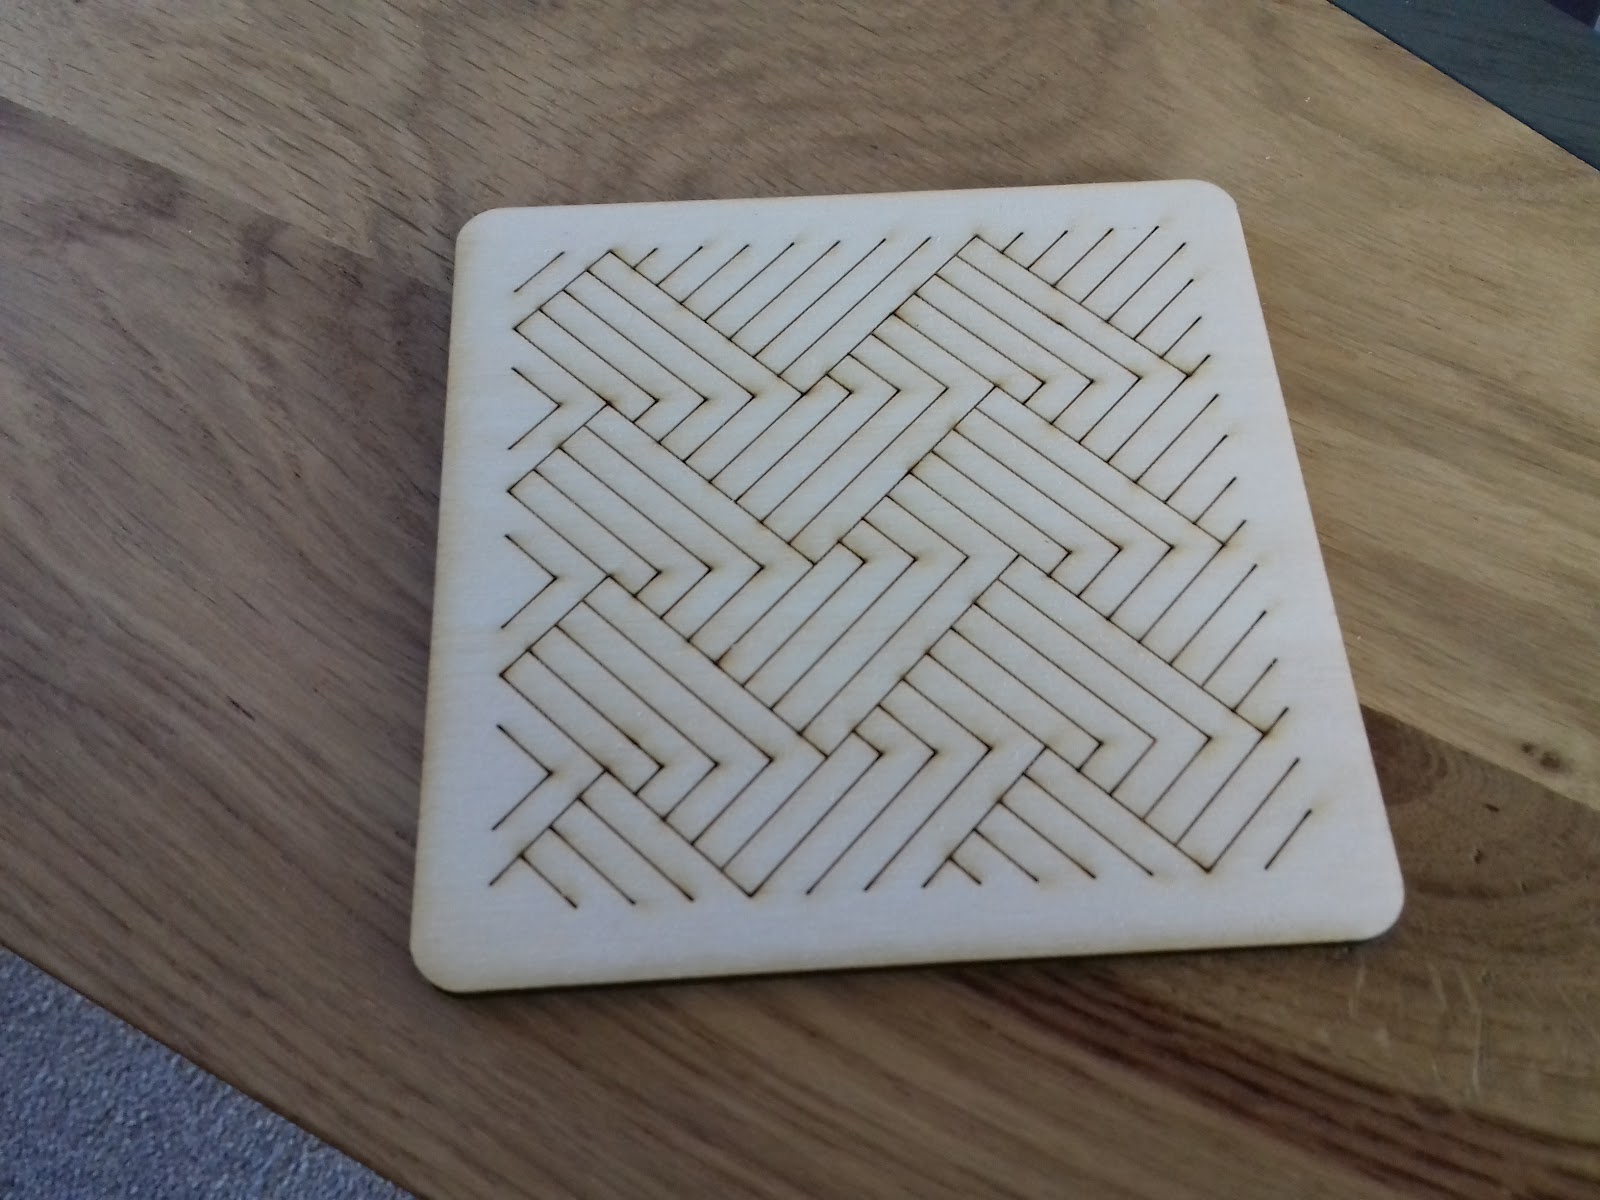
We bought a new coffee table to go in our new house and it's so lovely that I no longer want to put drinks directly onto the table. The table we left behind was a 15 year old Ikea Lack, with a big bend in the middle so easy not to care about it. Thankfully I have a workshop full of scrap wood and a laser cutter and a simple project like this was a good reason to resurrect the cutter. A little bit of drawing later to come up with some interesting line artwork and I cut these coasters to serve as a temporary solution on the new table. (svg here)

by noreply@blogger.com (MSRaynsford) at 18 April 2023 12:36 PM
12 April 2023
Martin Raynsford
Past the watershed
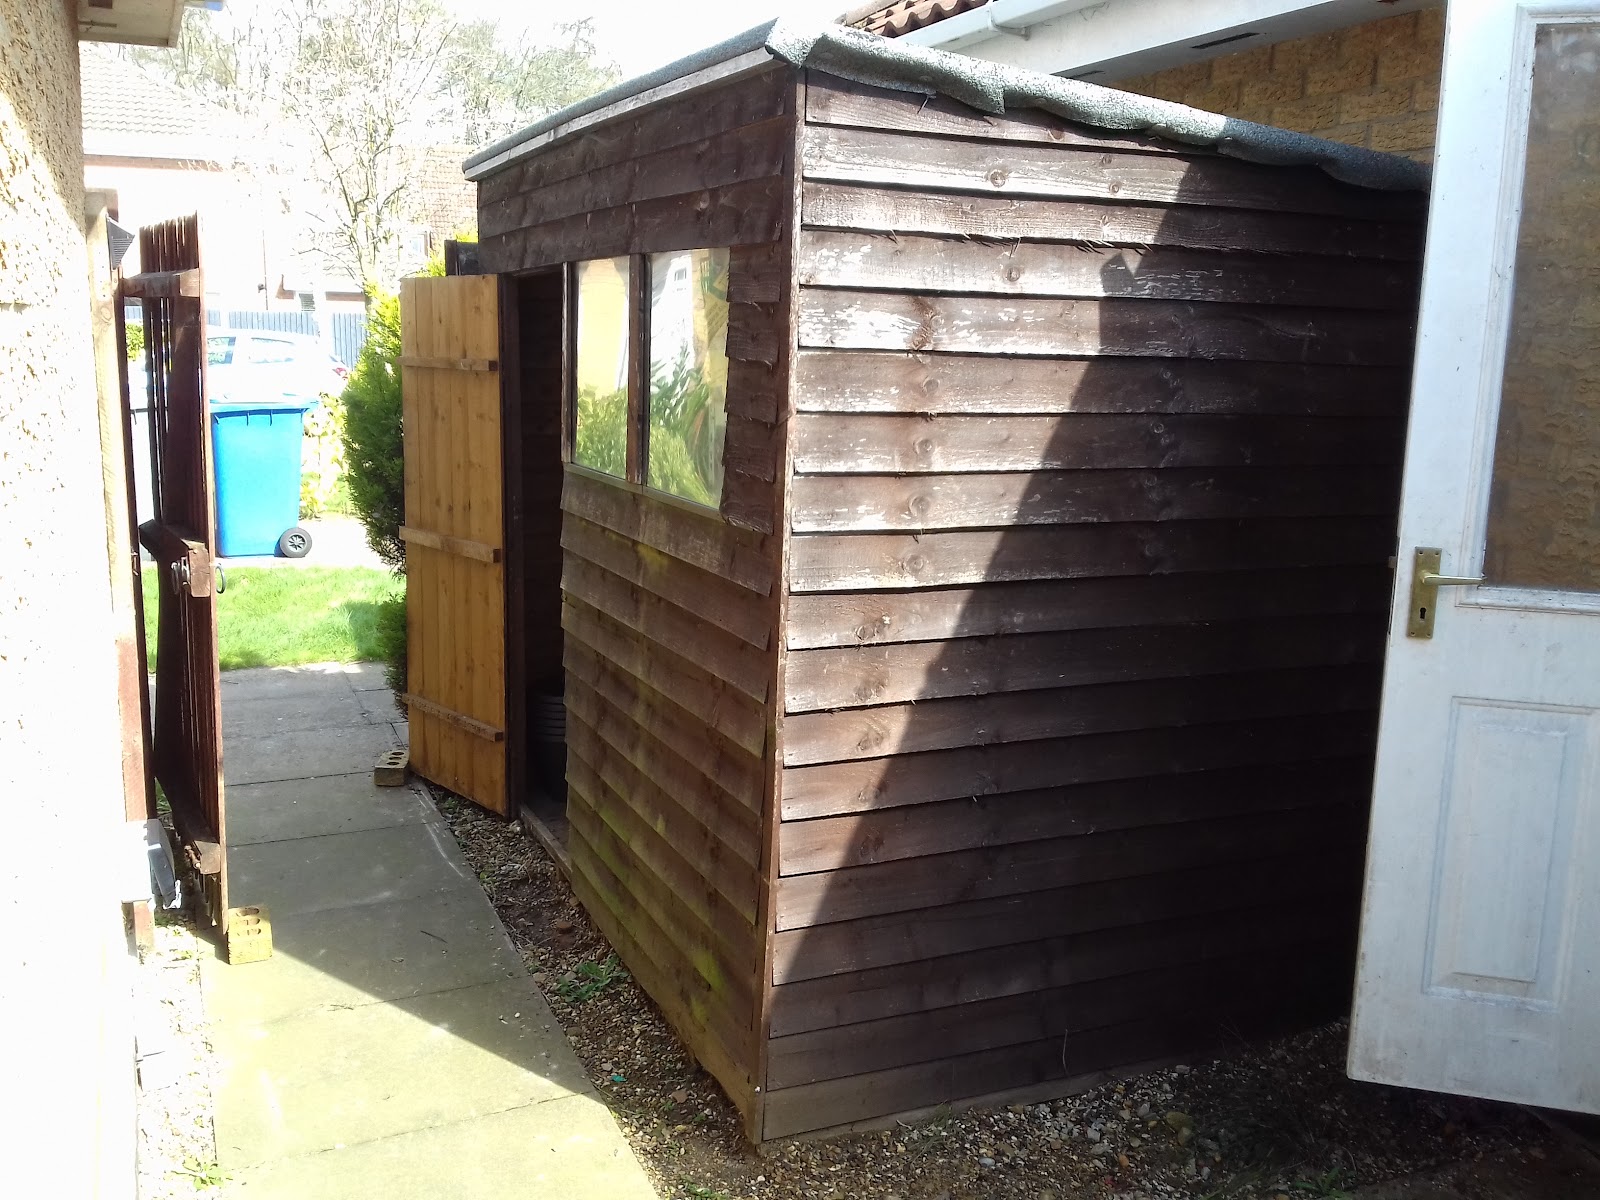

It rained all of the moving day and in some way that was actually a good thing. The water was running off the back of the shed and onto the wall of the garage. On the moving day it was so bad that the inside of the garage was actually wet (wish I had taken a photo). The shed must have been like this for years and the rain run off has soaked through the brick work making this whole wall damp. We took the shed down two days after we moved it, all the inherited junk from inside the shed is also now wedged inside the garage. There's three different types of flooring, a million ceramic tiles and twenty large cans of trade paint, some of the colours clearly from the last time round.

by noreply@blogger.com (MSRaynsford) at 12 April 2023 08:52 AM
05 April 2023
Martin Raynsford
Board Afternoon


by noreply@blogger.com (MSRaynsford) at 05 April 2023 08:10 PM
04 April 2023
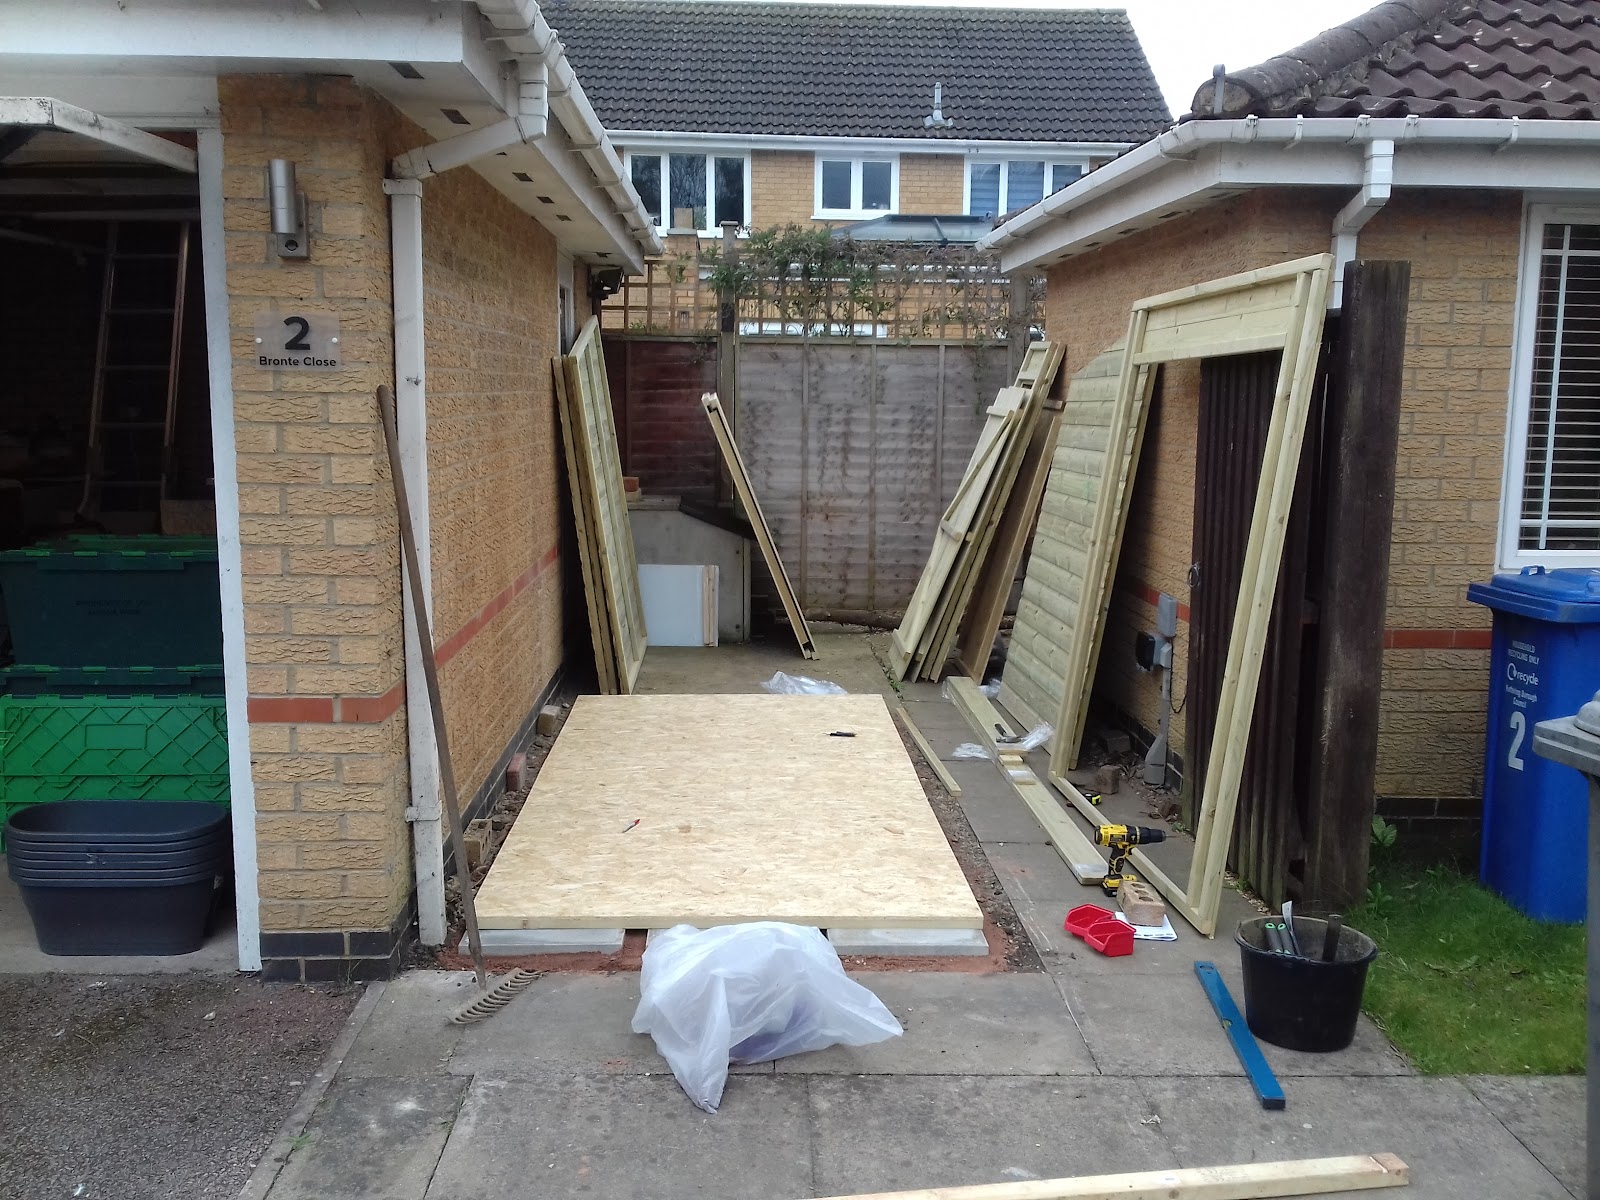
Martin Raynsford
New house, New Workshop


The first step today was to actually clear some space to move around in. The observant among you may notice that I just took all the junk from the middle and put it in the corner. This is mostly true but at least it's all better packed and I have more space to move around in. I could now move around there on a wet day which helps.
The more observant may wonder where the massive laser cutter is? I had to wheel that in and out of the garage to create any space in the first place. I'm sure it'll make an appearance as soon as I decide where I actually want it to go in workshop.
by noreply@blogger.com (MSRaynsford) at 04 April 2023 10:14 PM
30 March 2023
Martin Raynsford
Time to Move


by noreply@blogger.com (MSRaynsford) at 30 March 2023 05:21 PM
29 March 2023
Martin Raynsford
Aperiodic Monotiles - Turtles


by noreply@blogger.com (MSRaynsford) at 29 March 2023 10:51 AM
28 March 2023
Martin Raynsford
Aperiodic Monotiles - Hat
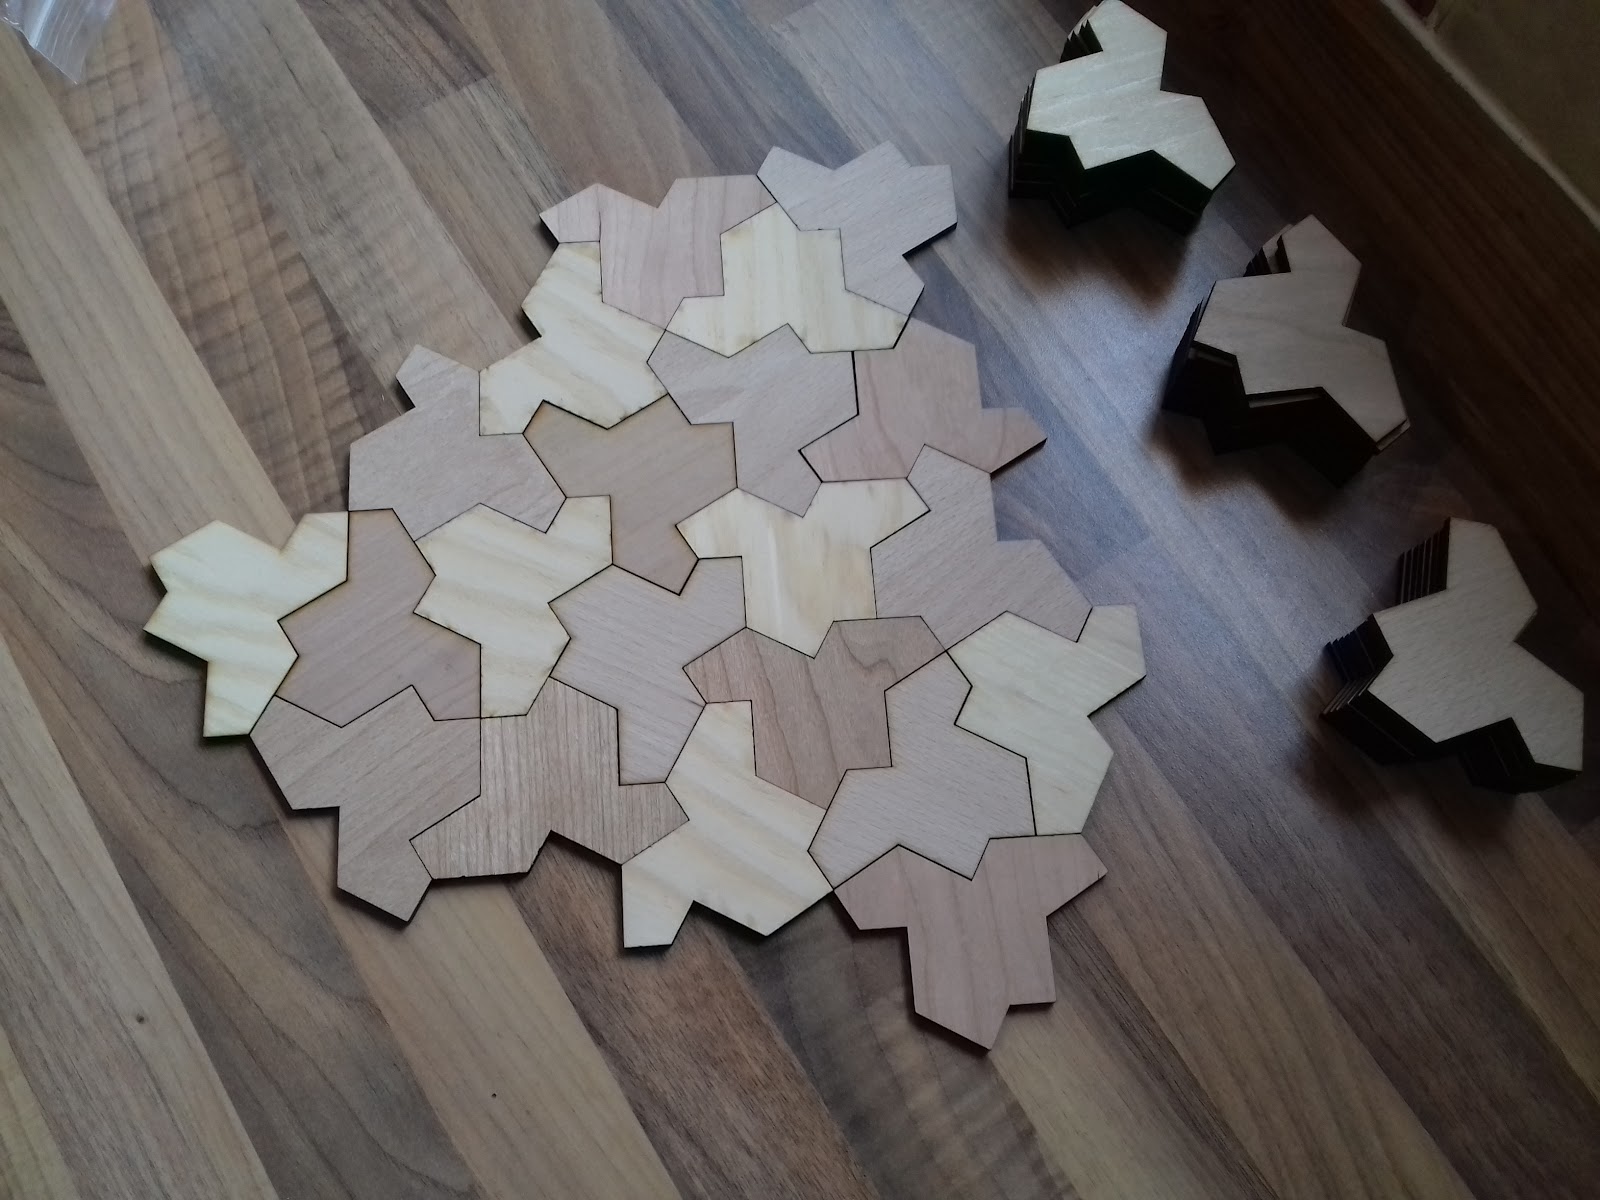
The discovery of a solution to the Einstein Problem has caused a bit of a stir in the mathematical world this week. It's a shape that tiles the plane, but never repeats and while I don't entirely understand the implications or the mathematical proof of such a thing, I know a good looking tessellation when I see one so I set about making up a few.
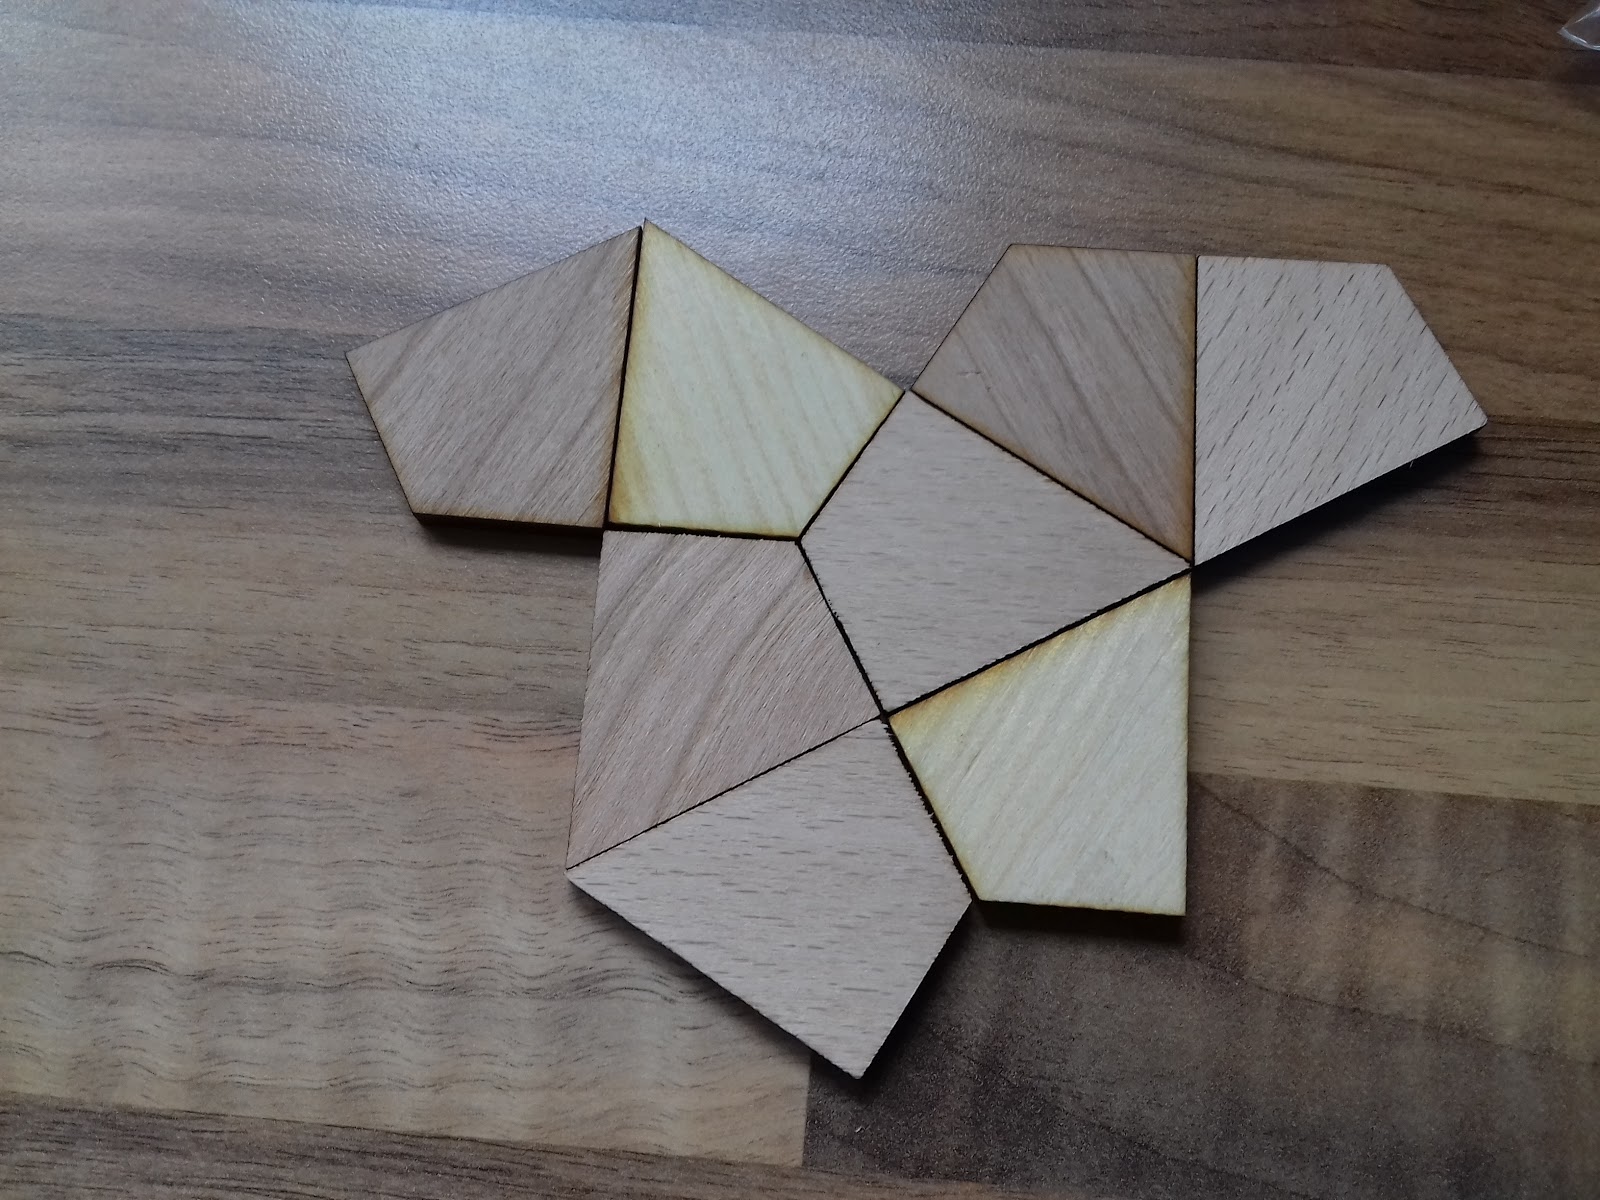

The full shapes are roughly 80mm across and 60mm wide and I cut them in three different flavours of wood veneered MDF, pine, beech and cherry (left overs from the Loki box)
I redrew my own sheet for cutting to ensure that all of the wood grains on all of the pieces align in the same direction and this is what gave me kites to fill in the gaps (svg here)by noreply@blogger.com (MSRaynsford) at 28 March 2023 03:49 PM
29 December 2022
Iain Sharp
Hantek6022BE USB Scope + OpenHantek6022 Fills a Useful Niche
I’ve been looking for a scope that can be always on my bench for making quick assessments of circuits running at low frequencies. My electronics bench is also my work desk, so space is very much at a premium. My full-size analog and digital scopes are too big to leave set up there permanently (PS, a personal annoyance with modern digital scopes is that their shape means you can’t stack other equipment on top of them). I do have a little DSO Shell kit-scope which is OK, but a bit fiddly to operate and only has a single, very low frequency, channel.
There are of course various handheld scopes and scope-meters on the market, and maybe they would be a good option, but they need to be positioned in prime desk space to reach, and that would be awkward for me.
So far, my Sinclair/Thandar SC110A has been the best bet, but the small screen means it needs to be carefully adjusted to get a good view of a signal, and that’s not helpful when you are probing around a circuit.
I did look at other small analog scopes (I like analog for quick exploratory tests), but didn’t find anything that had a combination of price, size and capabilities that worked for me.
I started to wonder if I wasn’t better off going a different route and instead of looking for a small scope, I should make use of the PC and 4K monitor that’s always part of my workstation. I’ve resisted PC scopes on the assumption that the software will be grim, and the whole experience will be klunky. I’ve not had a good experience with test equipment integration with computers since using HP-IB and HP Basic to automate test systems back in the 1980s.
However, I was intrigued when I saw a cheap Hantek6022BE scope on eBay, and finding out that there is a well-liked, lightweight, and Open Source software platform for it. It was cheap enough that I was willing to give it a go and see whether this device could become my everyday scope.
When the unit came I was impressed. The box that needs to sit on the desk is fairly small, and can be easily tucked-away. It can even be stood in its side for a smaller footprint. Getting the open source drivers and OpenHantek6022 application installed was easy on Windows 10 using the instructions on the GitHub ReadMe. OpenHantek6022 has a level of maturity not often seen on niche open source applications. In particular, the documentation is very comprehensive.
In use I find the combination of hardware and software basic, but effective. OpenHantek6022 is very usable, though there are a few UI things I would tweak. Everything is visible and you don’t have the feeling of “menu diving” like you do on a lot of digital scopes. It’s also very responsive (due to a small memory depth I suppose) in a way that feels a lot like an analog scope.
I was also interested to see that the scope was compatible with Sikrok’s Pulseview software. I had some trouble getting the driver installed to work with Pulseview. The 6022 and similar devices have a slightly odd way of managing USB firmware (explained in this video) which can easily trip you up. I found Windows 10 was picking up the wrong driver once Pulseview was run. To get the right driver for Pulseview I had to:
- Start Pulseview with the 6022 connected
- Find the device in the Windows Device Manager
- Right-click and choose Update Driver
- Click “Browser My Computer”
- Click “Let Me Pick From A List of Available Drivers On My Computer”
- Then I was able to choose the driver from the install package. Ignore the warning about the driver not being optimal (or some such wording)
Pulseview ran fine, and might be a useful alternative to OpenHantek6022 if you want to do long captures, or to do protocol decoding on signals. One annoyance is that Pulseview doesn’t seem to allow you to configure x10 probes, so to get the right voltage scale you have to use the probes in the x1 setting. The wrong voltage on the display wouldn’t matter too much, except that having the wrong voltages then messes up the process of protocol decoding by stopping the conversion of analog captures to digital equivalents for further processing.
Overall I think this is a great package at the price. With the open source software it’s no fuss, and super-usable. Great for doing quick checks on circuits, and with the advantages of a big display I can even see myself using it for more demanding measurements.
EDIT TO ADD:
One potentially serious disadvantage of the 6022 is that the ground terminals are connected to the ground on your PC. If you connect the probe’s ground lead to something at a different voltage then there is a risk of damage to at least the USB port and potentially the whole PC.
For me, this is a risk I can live with, but it does depend on your use-cases, experience, and approach to risk whether this is an acceptable situation. It’s certainly something to consider.
by Iain at 29 December 2022 09:38 PM
05 December 2022
Martin Raynsford
Free Trees

It's the festive season so I made this cute little Christmas tree for another project I was working on. It turned out so nicely I gave it a little revamp and thought I'd offer it up here as well. Hope everyone is well and enjoying the festivities.
It's made from 3mm Poplar ply and assembles with press fit joints. The rings just rest on the branches at an angle of your choosing. (svg here)

by noreply@blogger.com (MSRaynsford) at 05 December 2022 06:10 PM
23 November 2022
Martin Raynsford
Code Wheel Tray
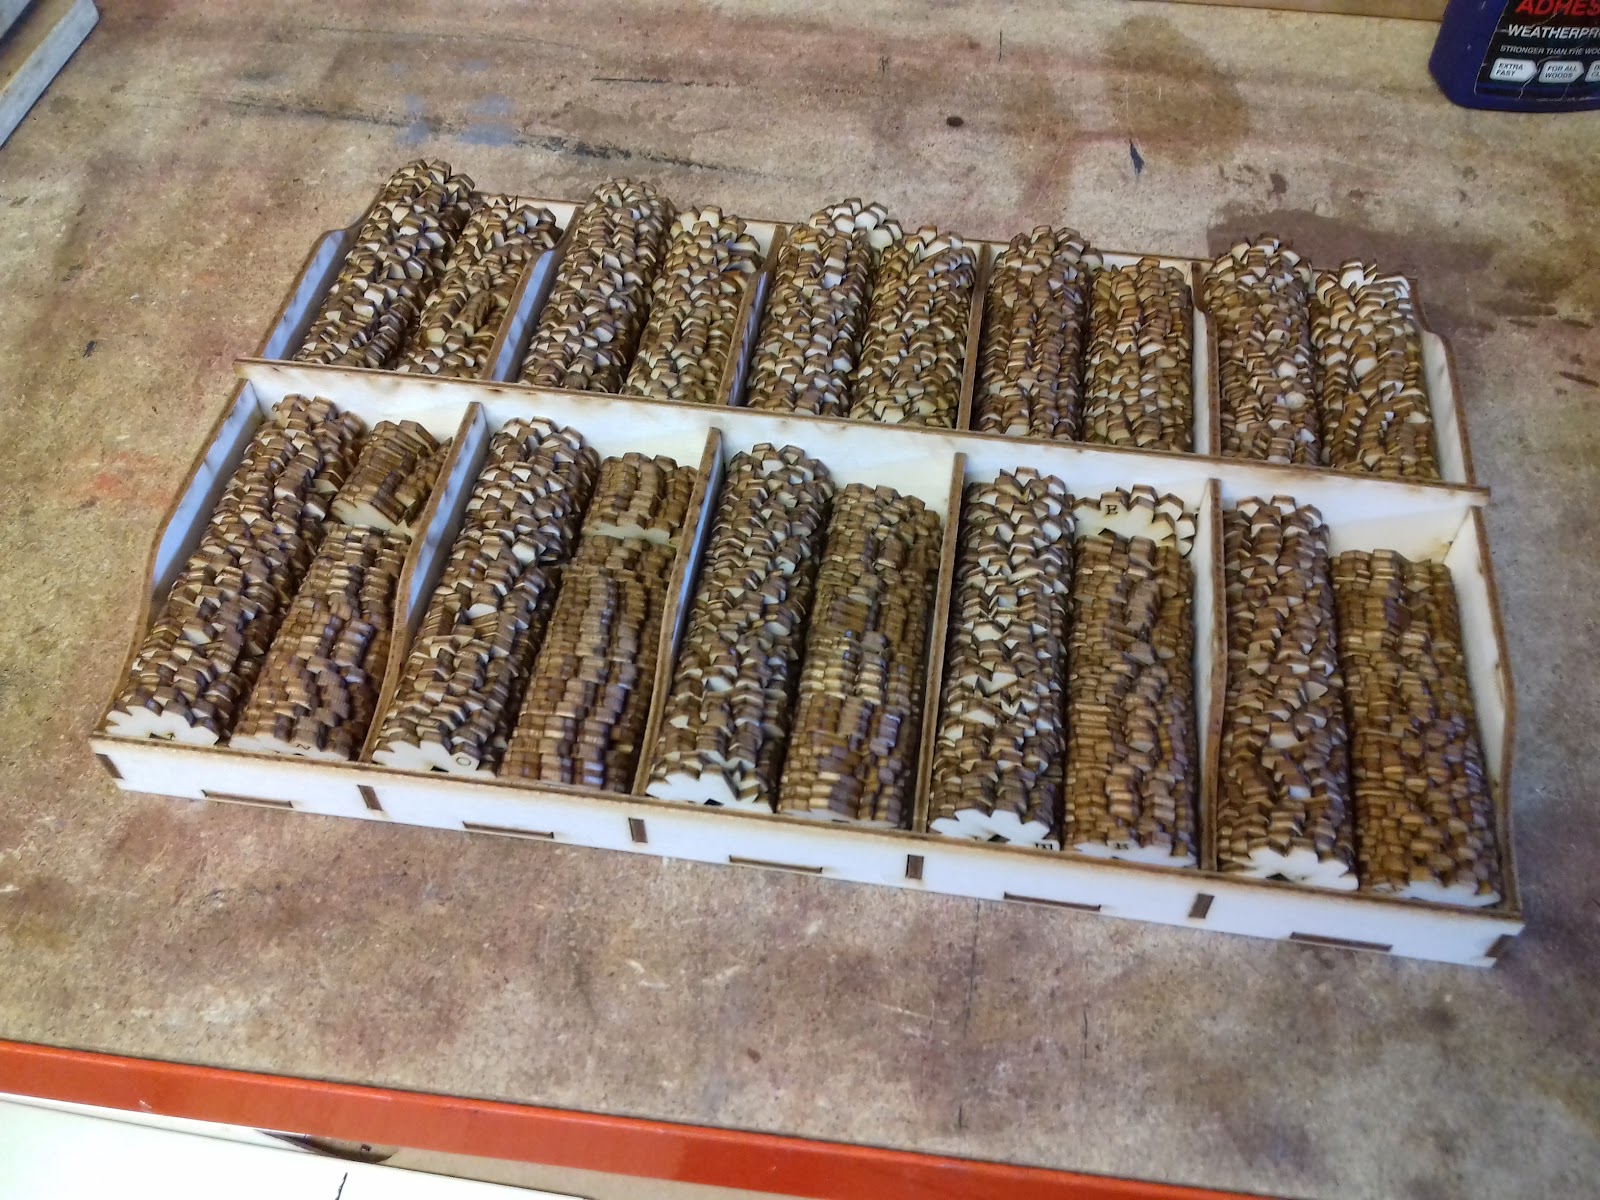

I've made similar trays before and they're usually quite a basic design, the trays I made for my Lego lack coffee table are still one of the most requested items on my blog. Over time though the bottom of the trays have warped and come away from the adjoining sections. This is largely due to the sheer volume of Lego but I guess age and children leaning on them have a part to play. Because of that I tried to design this simple tray a little bit differently. The vertical spars all slot together to form the spine of the tray and the base of each tray clips into the sides spars, rather than being glued to the bottom of them. This in theory should make the bases much sturdier and unlikely to break over time. Sadly it was all a bit of a faff to put together and I ended up splodging a lot of glue over everything but the theory is sound. I intend to take another shot at these trays as soon as I get some free time, experimenting with longer tabs into the side walls and different placements of them. It's still nice to get some inspiration from little projects like this though.

by noreply@blogger.com (MSRaynsford) at 23 November 2022 03:07 PM
15 November 2022
Martin Raynsford
Dislocation Campaign Nearly complete

There's just about twelve hours left on my latest puzzle campaign and it's been another amazing success. Three hundred and thirty backers have currently supported me to get this puzzle produced and I've spent the majority of the last two weeks pushing the laser hard to cut puzzles and pushing myself to assemble them. I promised to ship one hundred puzzles on the day that Kickstarter pays and a further one hundred before Christmas but I've actually managed to build two hundred puzzles already. I reckon I've got a further two weeks before KS actually pays out so with any luck I'll be able to get another hundred built and possibly all of them can ship at the same time. Either way I'll have finished production by the end of November (baring laser problems) and the whole campaign can be wrapped and shipped before Christmas which is a big win for me.
There's still time to get in on it too, until 6pm this evening when the campaign officially ends.
https://www.kickstarter.com/projects/msraynsford/dislocation-a-mechanical-puzzle-game?ref=3jwgz9
by noreply@blogger.com (MSRaynsford) at 15 November 2022 09:12 AM
25 October 2022
Martin Raynsford
Dislocation: Mechanical Puzzle Game

by noreply@blogger.com (MSRaynsford) at 25 October 2022 03:50 PM
21 October 2022
Martin Raynsford
Yet Another Bartop Arcade Cabinet


I decided to make a stand alone unit to fit inside the hole where the old joysticks used to be. This 2 player, 6 button arrangement works relatively well, holds two usb input pcbs and a raspberry pi. This means it can be removed and connected to any other TV using the HDMI.


by noreply@blogger.com (MSRaynsford) at 21 October 2022 09:04 AM
06 October 2022
Martin Raynsford
Hinged Pumpkin Boxes

I'm releasing the basic box shape for you to add your own pumpkin faces too, if you make and design one then please leave me a comment I'd love to see them. (svg here)

by noreply@blogger.com (MSRaynsford) at 06 October 2022 11:04 AM
05 October 2022
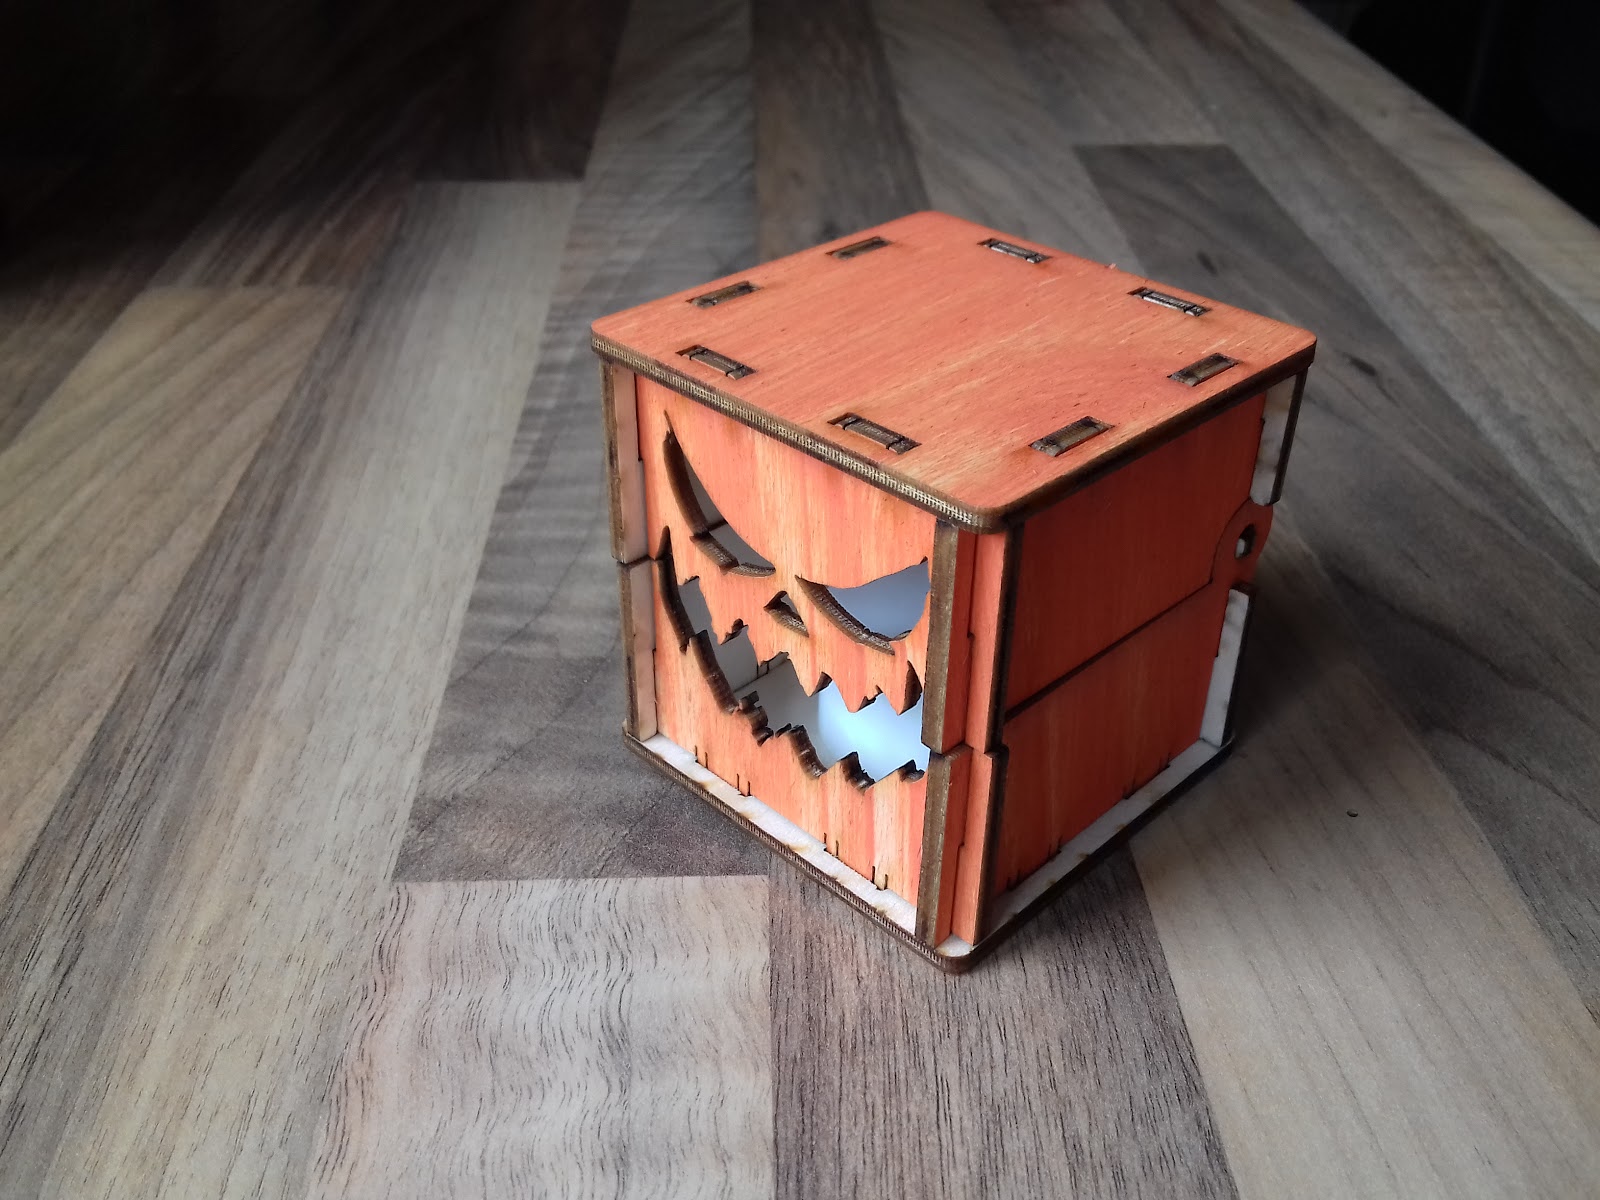
Martin Raynsford
Hinged Pumpkin Box 3
by noreply@blogger.com (MSRaynsford) at 05 October 2022 10:58 AM
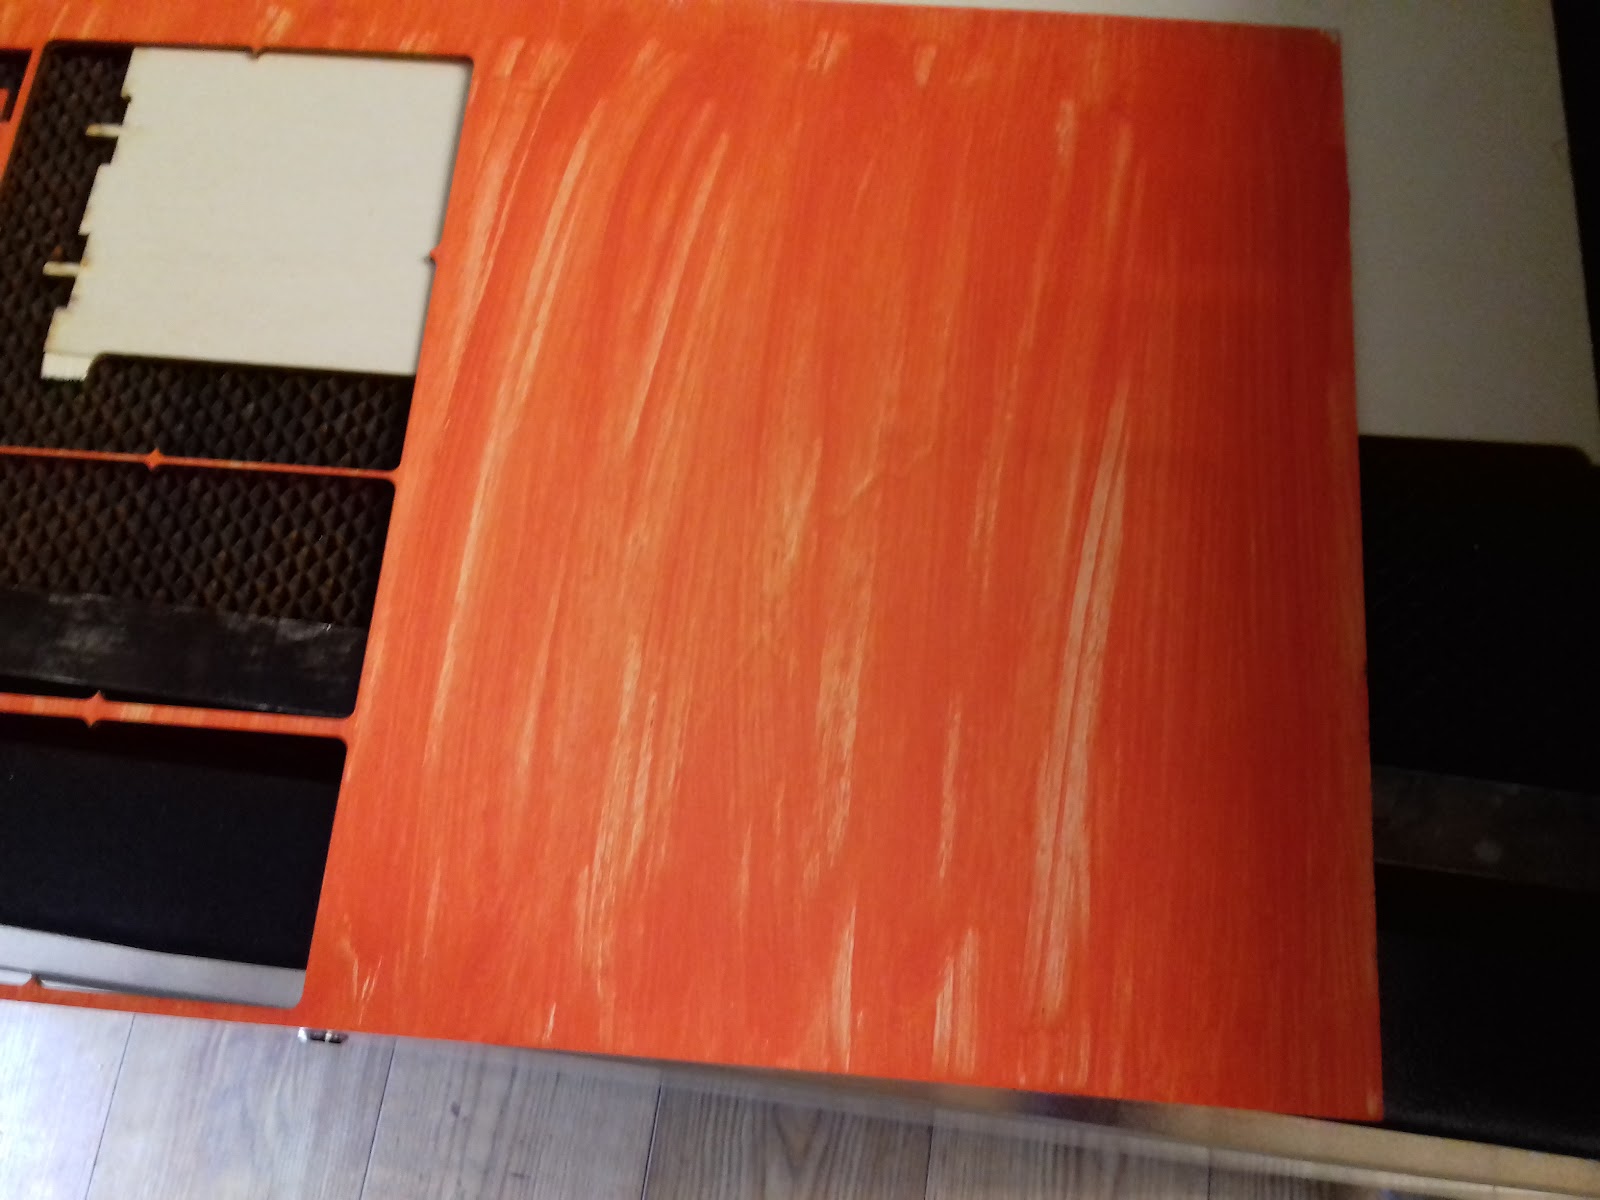
04 October 2022
Martin Raynsford
Hinged Pumpkin Box 2


by noreply@blogger.com (MSRaynsford) at 04 October 2022 10:52 AM
03 October 2022
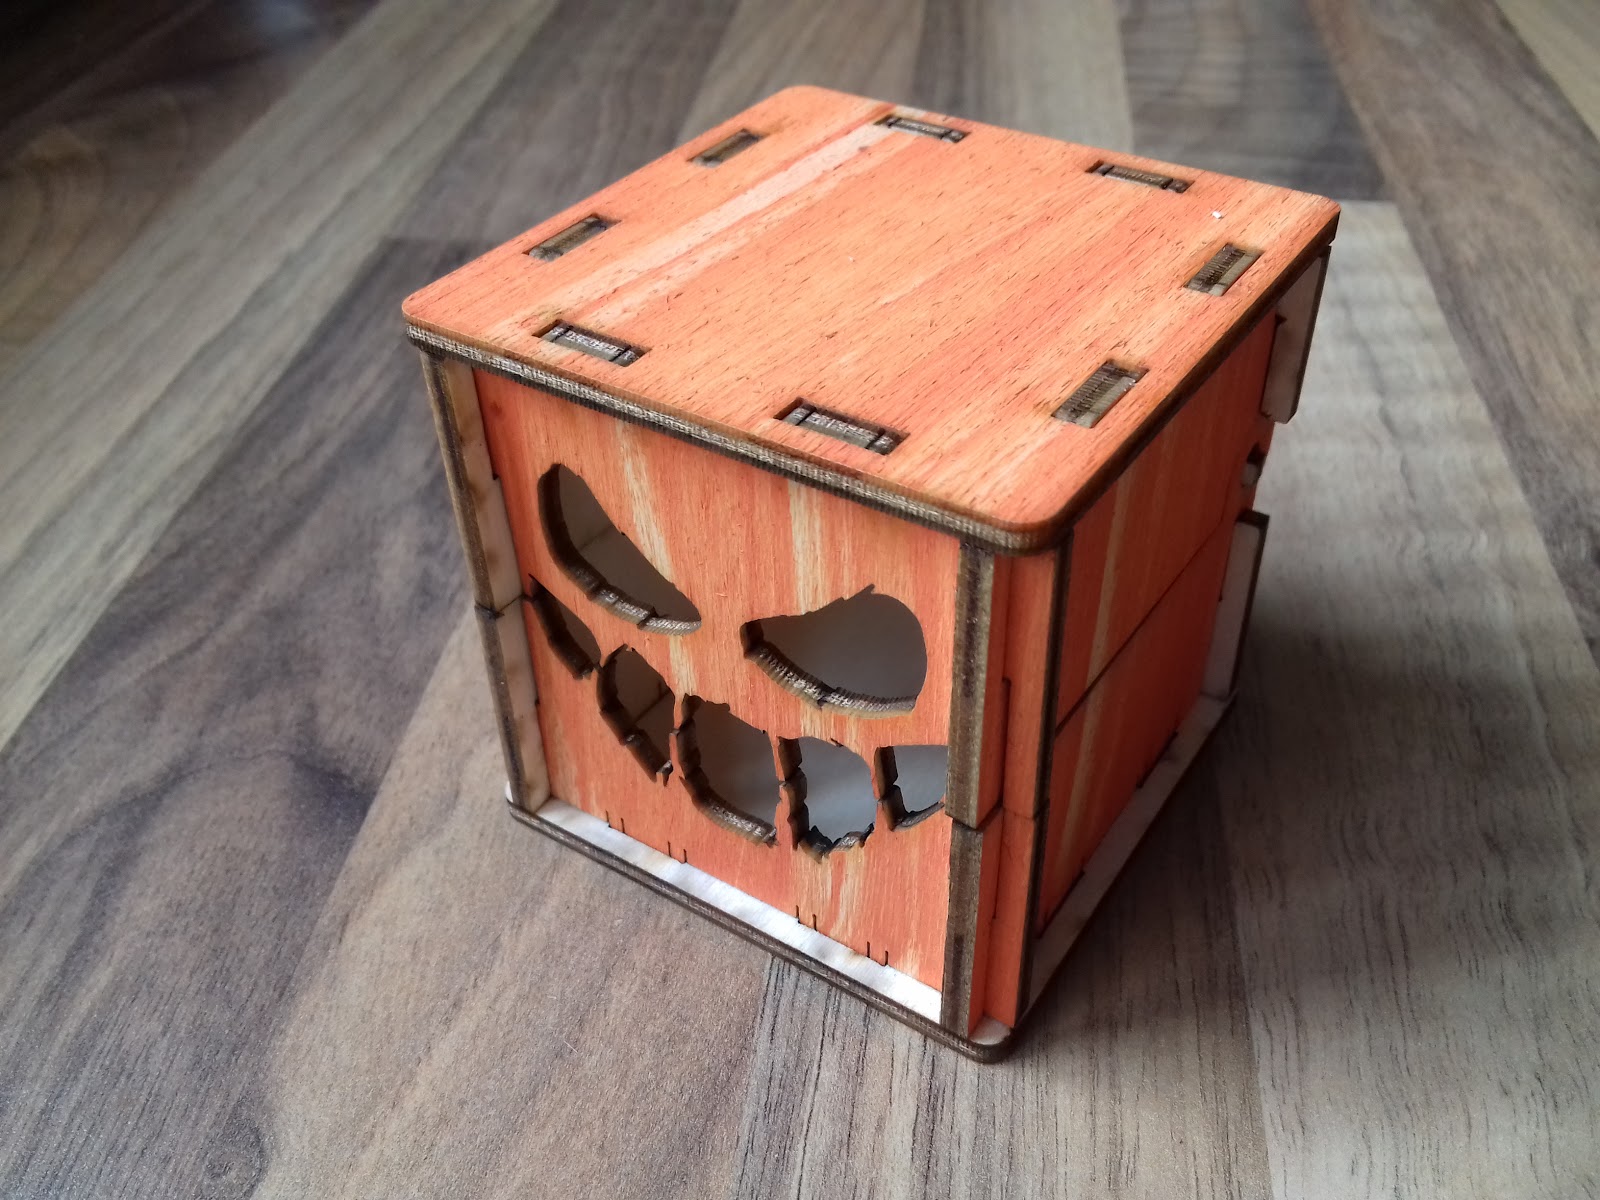
Martin Raynsford
Hinged Pumpkin Box

by noreply@blogger.com (MSRaynsford) at 03 October 2022 10:52 AM
19 September 2022
Martin Raynsford
Pumpkin Halloween Box

https://www.etsy.com/uk/listing/1307591527/3-halloween-box-plans-gift-box-files

by noreply@blogger.com (MSRaynsford) at 19 September 2022 04:02 PM
18 September 2022
Martin Raynsford
Ghost Halloween Box

https://www.instructables.com/Laser-Cut-Heart-Shaped-Box/. The process describes how you can make pretty much any shape using a mixture of separate flex sections and minimum bend radius curves. The outer skin is held in place while the glue dries using a former that is also cut at the same time as the rest of the box sides. Because the layers all nest inside each other these formers are a rather efficient usage of materials.

by noreply@blogger.com (MSRaynsford) at 18 September 2022 03:44 PM
17 September 2022
Martin Raynsford
Skull Halloween Box


by noreply@blogger.com (MSRaynsford) at 17 September 2022 03:44 PM
09 September 2022
Martin Raynsford
Magazine File
 |
| The new magazine file design |
 |
| Damage to the original box file caused by use |
 |
| Side panel joints are strengthened by overlapping material |
All of the joints have been made to push together snugly instead of needing glue. I've done some development on a new joint to enable snugly fitting tabs. I intend to blog about this at some point soon but each test like this gets me one step closer.
 |
| A left handed version, note the panel on the right is upside down |
by noreply@blogger.com (MSRaynsford) at 09 September 2022 03:29 PM
01 September 2022
Martin Raynsford
Acrylic Door Sign
.jpeg)
My wife became a fully qualified consultant at the start of last year but she's finally got a permanent job and settled into an office now. She showed me the A4 printout stuck on her office door displaying her name which was probably a subtle nudge that I should be making her a better sign.
This is made from 3mm Duo Perspex bought from Kitronik. It's a very thin layer of metallic gold acrylic on top of black acrylic so you can cut through the top layer and expose the black underneath it. Perfect for making these kinds of signs. I've just used some of my strongest double sided tape on the back because I'm sure someone will complain about holes in the door for any other fixing method. Hopefully it will last a while.
With a new job in a hospital 45 mins away, this means moving the whole family to a different town (as alluded here before), but that also means a double garage/bigger workshop for me. I've got plans to release more laser cut designs and once we've settled I think I'm going to have another go at making my own laser cutter so there's lots of interesting things ahead for us.
by noreply@blogger.com (MSRaynsford) at 01 September 2022 09:55 AM
24 August 2022
Iain Sharp
My Old BBC Micro
After a trip “down south” I recovered by old BBC from the loft recently.
It started life as a Model A and was then upgraded to a B, and later a disk interface was added. It also has a big “Sidewise” ROM/RAM board fitted. (My dad was an IT manager for British Gas and was a big believer in upgradability. He approached buying and owning a home computer with about the same attitude as procuring a mainframe for BG. To be totally fair, that strategy did work very well. We got a huge amount of use out of the Beeb over many years.).
Anyway, it’s somewhat dirty but the plastics are in good condition. It’s quite an early board with plenty of factory bodges – the most exciting of which is a variable capacitor trimmer on a bit of veroboard randomly above an IC. The original OS was 0.1, but it was upgraded to 1.2 when that came out.
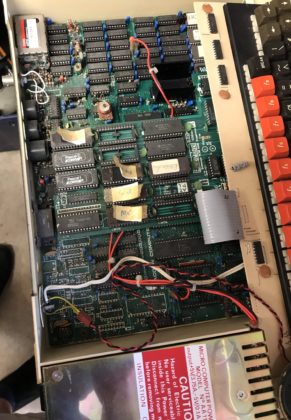
After replacing the usual suspects in the PSU and reseating the expansion board (a problem I remember back in the day) it came straight back to life. Looking at the bodges it’s surprising it worked at all, never mind after all this time. The Cub is a recent purchase BTW, back in the day we had a Philips portable TV with RGB input on the back.
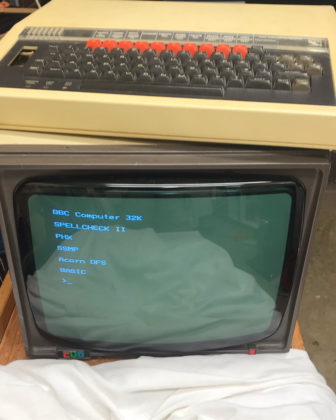
Quite a few ROMs in it – some even legitimate (ISO Pascal, Wordwise). I don’t remember how Basic got upgraded to Basic 2. The more unusual ROMs uinclude PHX (Phoenix) which was a special terminal emulator used by Cambridge Uni and a few others in the UK. It implemented a page editing protocol. I have an odd personal connection to that as I ended up making the official port of the protocol to the Mac 68k era. SSMP is some other kind of terminal emulator (not the messaging protocol), but I don’t remember what I used that for.
Disks and disk drive are currently MIA – possibly still at my dads.
by Iain at 24 August 2022 07:57 AM
09 June 2022
Martin Raynsford
Notable Remains nearly at the Stretch Goals

The sun may be setting on the #notableremains campaign but it will rise again in the #East.
by noreply@blogger.com (MSRaynsford) at 09 June 2022 08:08 PM
08 June 2022
Martin Raynsford
Notable Remains

While I'm still busy doing fulfilment for my own kickstarter project I find myself looking for other puzzle games to do in the evening. Notable Remains looks like it's going to be one of those amazing puzzle games because the underlying premise is great. Take all the fancy map details and turn them into a clever puzzle game.
The campaign was fully funded in an hour and, knowing the designer, it's a sure thing for fulfilment. As the campaign enters the last 24 hours it's also remarkably close to reaching the 'bonus game' stretch goal so now would be a great time to back the campaign and join us in the puzzle hunt.
#NotableRemains #East
by noreply@blogger.com (MSRaynsford) at 08 June 2022 09:47 AM
21 December 2021
Martin Raynsford
Puzzling Issues

I've been working on fulfilment of my newest puzzle box for the last few months. Loki's box of tricks has a number of puzzles locked in layers inside the box itself. As you solve each puzzle you progress to the next layer down until you get to the bottom of the box and your just rewards. Backers from my kickstarter campaign are still waiting for the box itself but a lucky few people have had the chance to play the whole game and this has led me to some interesting and tough decisions.

The final puzzle inside the box is a 6 piece board burr puzzle, once the burr is solved you're able to match the letters up to the code symbols and decode the messages in the box. It's a bit of a tricky solve requiring 24 moves so I set the puzzle up with some sign posting to show players the starting position. My issue is that the few people who have played the game have struggled even with the sign posting. I know they're mostly word puzzlers and definitely not mechanical puzzlers (no offence if they read this) but also a lot of my backers aren't mechanical puzzlers so it has me worried about the difficulty. It rather ruins the flow of the game because you get down to the third level, get massively stuck and put the box to one side, right before an AHA moment. When you finally get round to solving it all the momentum and enthusiasm is gone.
At the same this puzzle is proving a bit tricky to manufacture. I'm using 6mm ash veneer MDF and for whatever reason it seems to vary in hardness so it's not all cutting cleanly. If I turn the power up I get a lot of char and it's even worse if I have to cut the sheet twice to get all the way through. Some of it isn't entirely flat so the two sides for each burr piece have to be clamped and pressed. It's not all consistent thickness so after all that sometimes the pieces just don't fit between each other. I've been left with a very tough decision to redesign the puzzle and find a suitable alternative.

In steps the new Jormungandr puzzle to be a replacement. This puzzle had some very specific boots to fill and I think it's done a reasonable job. In a solved state it has to draw a connection between letters and symbols. It has to have an ouroboros snake theme. It has to fit in a game just 13mm wide and it has to be easier than the burr puzzle it's replacing.
Sure it's another tray puzzle and I really didn't want to do a tray puzzle in this box but I'm going to give my backers the choice between the difficult burr puzzle and the slightly easier tray puzzle. I'm hoping there will be a roughly equal split between the two especially because I've made 200 of the burr puzzles already.
by noreply@blogger.com (MSRaynsford) at 21 December 2021 08:52 PM
28 September 2021
Martin Raynsford
SVG Fonts

I've been working on a new puzzle box going by the name of 'Loki's box of tricks'. Like the previous puzzle box this has needed several new Hershey fonts to speed up the laser cutting. This one was designed to look like Norse runes. While I was going to the effort of tidying up the font it seemed like a good idea to share them all publicly. Hopefully someone will find this useful.
by noreply@blogger.com (MSRaynsford) at 28 September 2021 04:41 PM
03 May 2021
Iain Sharp
Metronome from an Event Badge
Did I mention that I am learning to play the piano? When I started reading music I expected the hard part will be recognising the notes, but with practice I’ve got that fairly sorted. The consistently hard part is recognising the rhythms and being able to play them right. I found having a metronome or drum track really helps with rhythm practice.
I’ve been a bit frustrated that none of the metronome options I found were quite what I wanted. There are 1001 apps of course, offering many features, but I find them a bit painful to configure how I want, and the UIs often trade gloss for practicality. Plus, somehow having my phone in front of me when I am playing isn’t quite nice. Stand-alone metronomes on the other hand seem to be too basic with klunky controls and poor displays. I wanted something that covered 90% of my use cases in a way that was simple, visual and usable.
I also had an unusual requirement that doesn’t seem to be supported in any off-the-shelf solution I could find. I wanted to use a pedal to play the beat myself, but have that mapped on to a drum pattern to help follow the strong and weak beats in a bar.
I recently got a Korg Volca Beats (VB) as a way to create easy drum tracks. It’s basic, but fun. It almost passes muster as a metronome too, but again it can be a bit too much effort to configure. My initial goal was to use the sync in signal on the VB to provide a pedal input to step through its sequence. Sounds simple, but in practice it was a nightmare. The VB seems to do some kind of interpolation of the sync in signal and if its slightly irregular it can trigger weird double steps on the sequencer. After a lot of frustration I gave up on that approach.
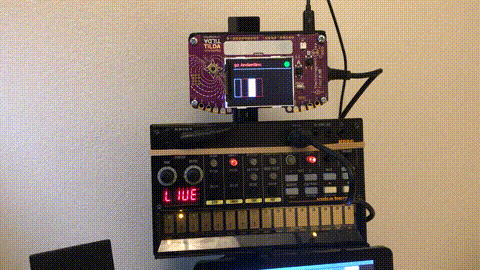
I went for one last try with an idea to use the MIDI in on the VB to trigger the drums from an external sequencer that could work like a normal metronome or be stepped using a pedal. Like many people I have a box full of development boards from various sources and rather than buy something new I wanted to use one of those. It came down to a ESP8622 board from a Nottingham Hackspace event or the Tilda Badge Mk 3 from EMF Camp 2016. Something had broken compatibility between the current Arduino IDE and the ESP8266 board I had, so I went with the Tilda Badge which turned out to be really well suited to the job.
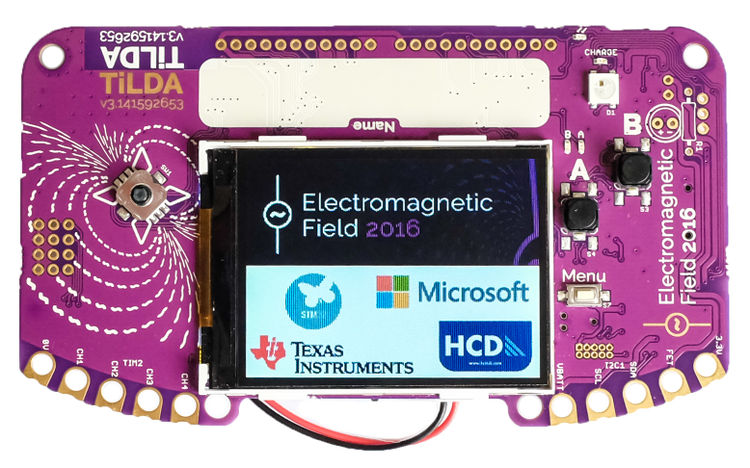 The Tilda Badge Mk 3
The Tilda Badge is programed in Micro Python which is really productive once you get your head round how to use it. The approach I used was different from the ones suggested in the documentation. I connected the badge to my PC which allows it to mount as a mass storage device and as a serial console. Copying a file called “main.py” to the root of the mass storage device creates an application that the Tilda Badge will run on boot. I edited my main.py on the PC and just used a CMD command line to do the copy. To run without resetting the badge, I used this command in the – 115200 BAUD – serial console (courtesy of Stackoverflow):
>>> exec(open("main.py").read())
The advantage of this approach was I didn’t need to install anything special on the PC and I could quickly iterate versions.
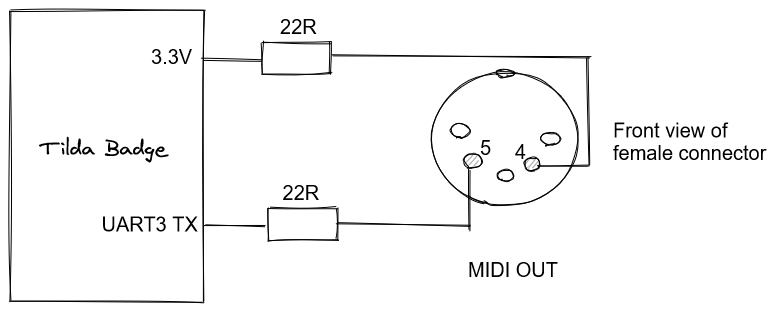
To support a MIDI output I just had to add the simple circuit below to the UART3 TX which is available on the GPIO port of the Tilda Badge. (Note – the pin positions on the DIN connectors used for MIDI are totally confusing. I think this is right, but I would rely on the pin numbers more than the positions in the event of conflict!) The pedal is just connected between the CH1 GPIO pin and ground.
The Tilda Badge turns out to have just the right level of functionality for this application. The connectivity is more than good enough. The display is big and clear enough to show a good visualisation. There are enough buttons to provide easy access to all the services without having to do any “menu diving”.
Software for the Tilda Badge is here (it’s very rough, but does the job).
The finished project integrates in to an accessory system I build with V-slot on the back of my piano stand (that’s another story). I 3D printed a case that attaches the Tilda Badge to the V-slot. It keeps the front of the Tilda Badge PCB fully visible so you can still see its origin, but it protects the back and provides mounting points for the MIDI and pedal sockets.
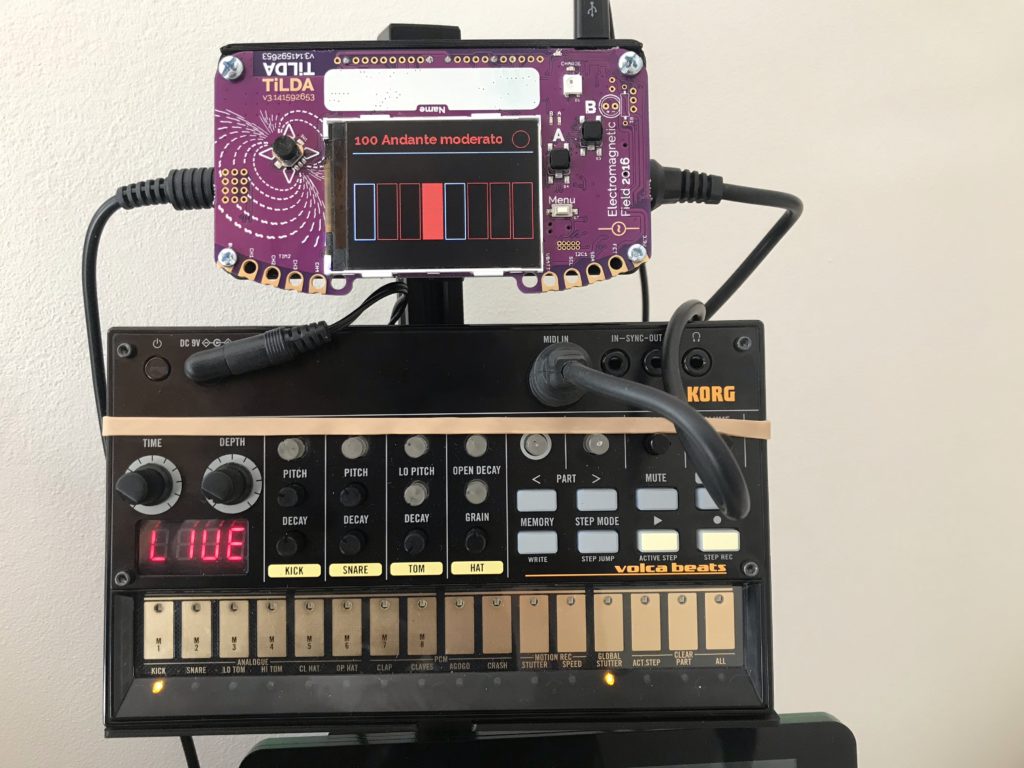
Overall it is a really pleasing project and it’s nice to find a long-term use for one event badge. It’s fair to say I haven’t been a fan of the trend for electronic event badges – I think a lot quickly become e-waste and they can be a distraction from other parts of the event. But in this case it has been practical as well as cool. It also shows the value of an open, and documented, project that I was still able to pick up the badge after 5 years and immediately start developing on it.
by Iain at 03 May 2021 02:37 PM
19 March 2021
Martin Raynsford
Half Hour puzzle

by noreply@blogger.com (MSRaynsford) at 19 March 2021 10:56 PM
13 March 2021
Martin Raynsford
Dye Rack


by noreply@blogger.com (MSRaynsford) at 13 March 2021 12:14 PM
10 March 2021
Martin Raynsford
Antikythera Tablets Complete

I've had a very busy 6 months since I launched my most recent puzzle box on Kickstarter. It has been very well received with most people really enjoying the design and puzzles. The Antikythera tablets sold 400 units which basically left me working solidly to fulfil them, factor in some home school and lockdown and I'm sorry I haven't posted anything for 6 months. I did however record some assembly videos of the making process and I thought it would be quite cool to collate them here in a single post.
If you're interested in purchasing your own set, they're now in stock and available to ship immediately.
https://msraynsford.ecwid.com/The-Antikythera-Tablets-p234225720
Lid Lock

Like all good puzzles, before you can get to the actual puzzle tablets, you have to solve the lid lock to gain access to them. This is a series of slider bars that need to be removed before the lid becomes accessible. This is probably the most mechanically difficult to build and took me quite a while to perfect all the gluing steps.
Perseus Tablets
Heracles Tablets
Theseus Tablet
Sisyphus Tablet
Odysseus Tablet
Whole Box

by noreply@blogger.com (MSRaynsford) at 10 March 2021 01:44 PM
24 January 2021
Iain Sharp
BBC Micro on MISTer
During Covid-19 lockdown one of the things I wanted to do was to revisit some of the old computers I used. I don’t really have the space or inclination so collect the original hardware, so I decided to try out what emulation options exist now.
I have been interested in trying some ASIC based projects, so a natural choice seemed to me to use the MISTer platform. This is a retro computer, console and arcade emulation system based on the DE-10 Nano FPGA development board. This MISTer project was developed from the earlier MIST project which used an older development board.
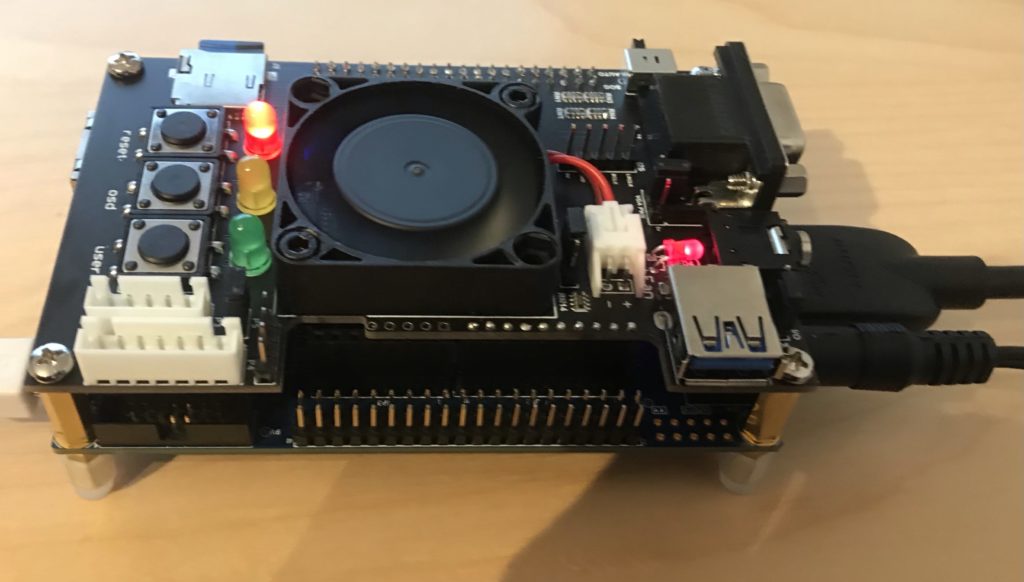 DE-10 Nano with MISTer expansion to support secondary SD Card
To get started with MISTer you just need the DE-10 Nano board, but I also chose to get the MISTer add-on board, mostly for the secondary SD Card (more on that later). Most of the emulation cores, but not the BBC Micro, need a RAM add-on board too.
Once you have the DE10 you can just flash the MISTer core on to an SD Card and boot it. You will also need a USB keyboard connected to the “USB to go” socket.
Some useful keys:
CTRL-F11   Break (BBC Micro)
F12        Load MISTer menu
 BBC Micro booted using MISTer
One limitation of the current core is that it doesn’t support split-mode games like Elite and Revs.
Using BEEB.MMD
The BBC Micro core uses files in “MMB” format. This was a format originally developed for a BBC Micro add-on that connects SD cards to the user port and makes it look like a virtual set of disk-drive. The MMB file is a bundle of hundreds of BBC floppy disk images. Using commands on the BBC Micro you can choose to mount the images from the file in to virtual drives.
The BBC core offers two ways to mount the MMB file. If you have a secondary SD card then format as FAT32 or FAT16. Copy the MMB file as “BEEB.MMB” on to the card. The core will automatically pick up that card. In this mode the file can be both read and written.
The alternative is to rename the file as “.VHD” and copy it to the “games/BBC Micro” directory on the main SD Card. If it is called “boot.vhd” then it will be automatically loaded. If not then you can manually load from the MISTer menu. In this mode the file is read only. To unmount a previously mounted VHD (e.g. to go back to the secondary card) press backspace when picking the VHD.
There are various utilities to manipulate MMB files on PCs. I used “MMBReader” which is available on the stardot forum. On the emulated BBC Micro the MMB file is accessible using MMFS. Note that if no MMB file is available then MMFS will stall the boot of the BBC Micro by displaying the message “CARD?”.
Some useful MMFS Commands:
 *DCAT [start #] [end #]   - List disks in the MMB file
 *DIN [Drive #] <Disk #>   - Mount disk in the specified drive (default 0)
Most of the MMB files you will find on the web are pre-loaded with many original games. By default they boot in to a menu to pick the games. You can disable the autoboot on the first disk by using the command *OPT 4,0. If you subsequently want to run the boot use *EXEC !BOOT.
by Iain at 24 January 2021 02:37 PM
20 January 2021
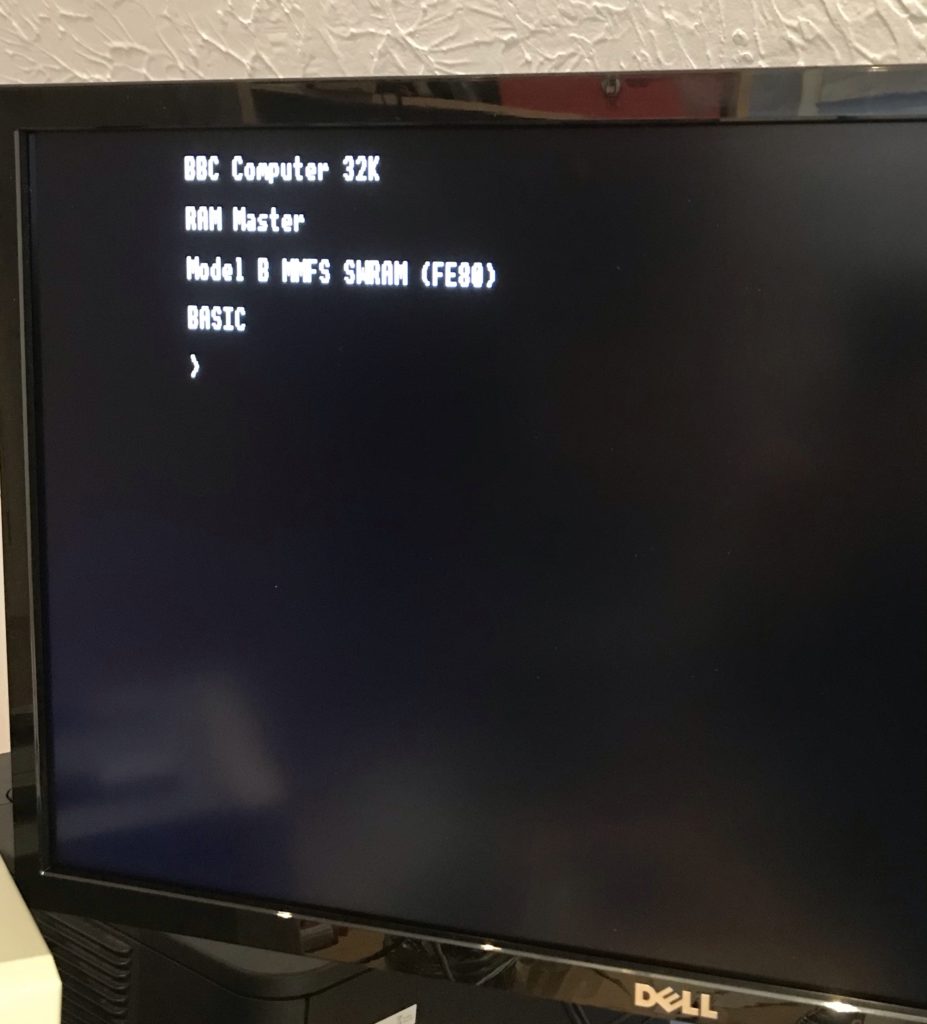
Iain Sharp
Grid Runner – BBC Micro Juvenilia
My first computer was a BBC Micro Model A (early version with the linear PSU and bodge wires on the circuit board). Later we upgraded it to a Model B. I loved it, and even took it on holiday a few times (!) My parents must have been very understanding.
I was amazed today to discover that the BBC Micro community has saved two very obscure games I wrote in my teens and you can now play them in the browser:
Grid Runner
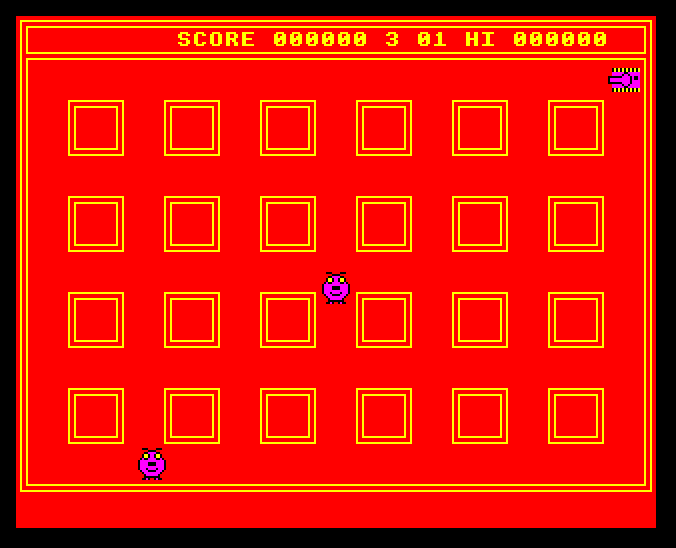
http://www.bbcmicro.co.uk/game.php?id=636
Grid Runner II
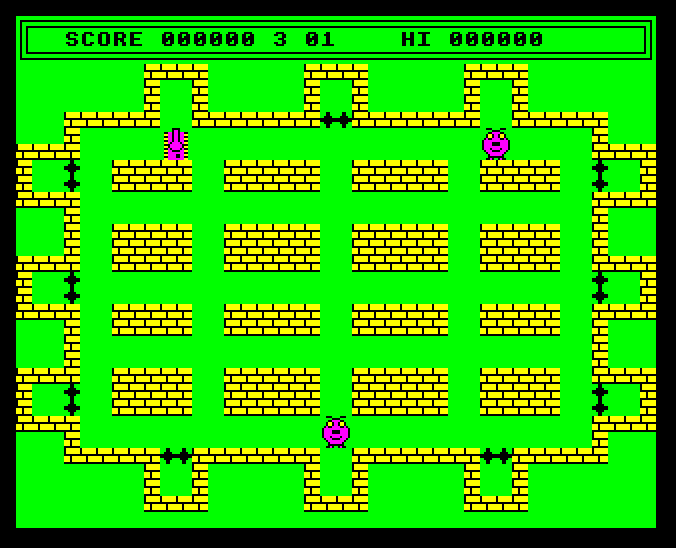
http://www.bbcmicro.co.uk/game.php?id=765
IIRC selling Grid Runner was the first money I ever earned. The BBC Micro magazine Beebug (which was based close to where we live) included it in a demo disk (image via a kind user of the StarDot forums).
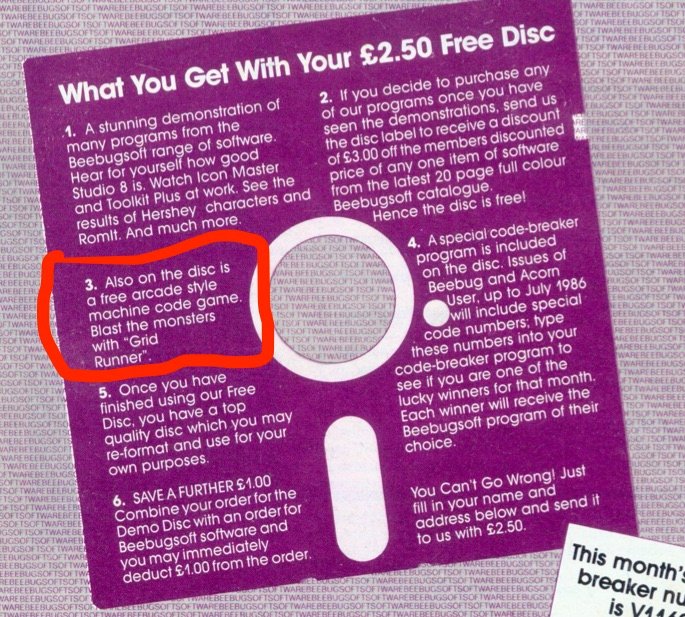
In case you are wondering, I am not colour-blind. The clashing colours were inspired by the BBC classic game Frak.
JS Beeb is fantastic BTW.
by Iain at 20 January 2021 09:10 PM
30 December 2020
Iain Sharp
Networking CATWatch
(or an overkill solution to tracking the movements of a cat)
I don’t mind cats, but we have one Top Cat (subsequently TC) living locally who thinks he (or she) is the boss of everything. After one too many cat shits and dead birds in our back garden I decided that TC was no longer welcome and was going to be excluded.
Early steps were very simple – filling in the gap under the gate prevented easy access until TC found new ways over the gate and fences. I then decided a more through approach was needed. I installed a Pi Zero W with a night vision camera module (1) running motion project software so I could see whether TC was coming in the garden and perhaps how it was getting in. It works OK with the caveat that the Motion Project software is pretty simplistic in its approach to doing movement detection and even after tuning the parameters I get a lot of false positives. It is a little painful to manually check the output, but that’s OK.
 Night Vision Camera Module (before I removed the IR LEDs)
I also put in an ultrasonic cat deterrent on the edge of the lawn. This is a passive infra-red (PIR) motion detector linked to an ultrasonic sounder that is supposed to scare cats. There are lots for sale – I used the RSPB CATWatch. It is a battery powered device where motion detected by the PIR triggers an ultrasonic alarm that sounds at about 20kHz for a few seconds. Interestingly, the alarm doesn’t just play a single tone, it varies the tones during the alarm period, presumably to prevent cats getting habituated to the sound.
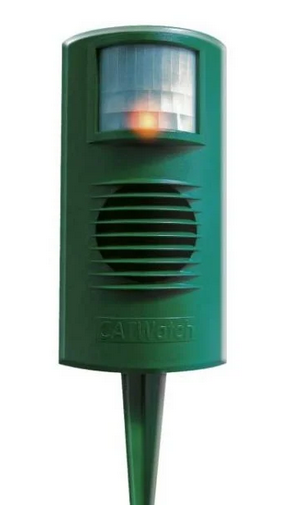 RSPB CATWatch
After that we didn’t see TC in the garden for quite a while. We thought the CATWatch probably was scaring it off, though we never caught it in the act. But, one day the camera caught TC strolling around the edge of the lawn, just out of range of the CATWatch PIR detector. Knowing TC was still coming in the garden I followed the example of my neighbour and put cat deterrent spikes around the fence tops, and (so far) we haven’t seen TC again.
But, here is the problem, how do I know TC isn’t coming in any more? The camera sees a lot, but it also misses a lot. Despite its name, the CATWatch doesn’t really watch cats, it just scares them off. In fact you have no way of knowing how often it has been triggered. I wanted a CATWatch extension to log when it was triggering, and ideally to trigger the camera to record too. So, there are two problems:
- How to cause a trigger for the CATWatch to activate an external circuit, and
- How to connect the CATWatch to the Pi Zero without running wires everywhere?
I started thinking about how I could get a wireless signal from the CATWatch to the Pi. My requirements were:
- Simplicity
- Keep the CATWatch battery powered without significant reduction in battery life
- Fast reaction so that the camera will be activated while the cat is still in the vicinity.
The obvious option was WiFi, but keeping that running long-term on a battery is problematic. If you disconnect from the WiFi to save power then reconnecting will add a delay which might not meet the “fast reaction” requirement.
BLE was another option, but the thought of working out the right stack of hardware, libraries, low power modes etc. to make it work made my eye twitch. Modern systems are amazing, but, unless you already know the ecosystem and tools, understanding enough to use it effectively can be a massive PIA.
I realised what I wanted was something very simple, almost primitive, that I could just hook up at each end to send an on/off binary signal. The technology that seemed to fit that best was 433MHz radio remote controls used for garage doors and similar things. I bought a set of 5 key fob transmitters and a 2 channel relay board receiver on ebay. The plan was to put a transistor across one button on the transmitter to send and to remove the relay to get an open collector transistor output on the receiver.
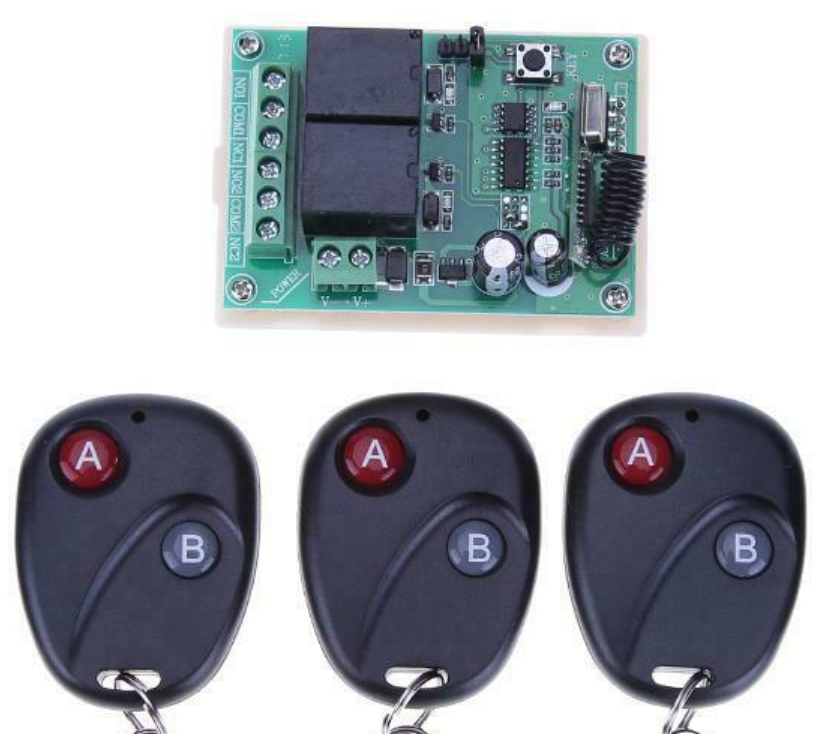 433MHz Receiver Board and Some of the Key Fob Transmitters
The receiver board is rated for 12V input, though it worked down to 9V. What I really wanted was for it to be powered off 5V from the Pi. Looking more closely I found, as I expected, that the only part of the circuit that used the 12V was the relay coil. The rest ran on 5V from an internal regulator. I removed the relay and bypassed the power regulation on the board to produce a 433MHz receiver that ran on 5V and could (using an open collector output that originally drove the relay) link to a 3.3V GPIO input on the Pi.
The transmitter fob was very simple – the two buttons just connect a wire to the positive end of the 12V internal battery when pressed. So the only unexpected problem is that I would need to implement a high side switch, rather than a low side switch as I was expecting.
Getting the CATWatch to activate an external circuit would probably be easy, but for one problem: all the electronics are potted in resin except for the power-in and the wires going to the ultrasonic transducer. So, there is no obvious binary “alarm” signal accessible to drive an external circuit. You could trigger based on the ultrasonic output, but I thought it would be easier to use the power input and detect the very marked increase in power consumption that occurs when the alarm is turned on. I put a 15 Ohm shunt in the power line driving a PNP transistor to do the high-side switching for the transmitter (as shown in this simulation). I decided to keep the two circuits on their original batteries, so, to do the high-side switching, these two batteries connected positive to positive as shown.
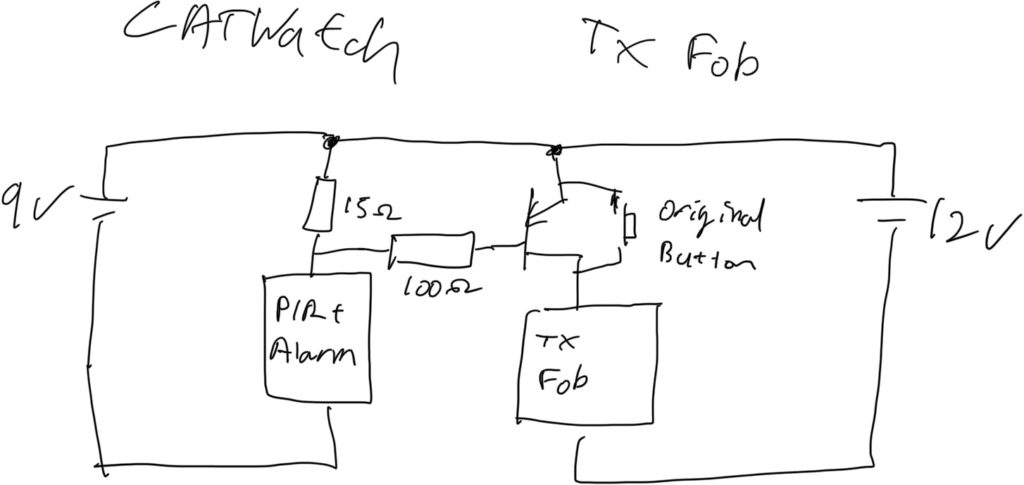 Block Diagram of Connecting CATWatch to the Key Fob Transmitter
As always, I hit a snag at the last moment. There was enough space in the CATWatch to include the transmitter fob in the unmodified case, but I found that when the case was closed the alarm wouldn’t turn-off once it had been activated. My suspicion is that the transmitter interferes with some high-Z input that is being driven by the PIR and the circuit keeps thinking it is detecting new motion. So, I 3D printed a “back-pack” that contains the fob circuit and can be attached to the back of the CATWatch away from its electronics. That worked fine and also makes it easier to change the fob battery if needed.
On the camera side I also got the 3D printer working to make a case to contain the Pi, camera and 433MHz receiver. This is attached to a sheet metal bracket (made from an old baking tray) which allows the camera to be hung from our windows and the window to still close. I wrote a small Python script that monitors the GPIO connected to the 433MHz receiver and logs any events. It also uses the Motion HTTP API to trigger Motion to record video if the CATWatch is activated.
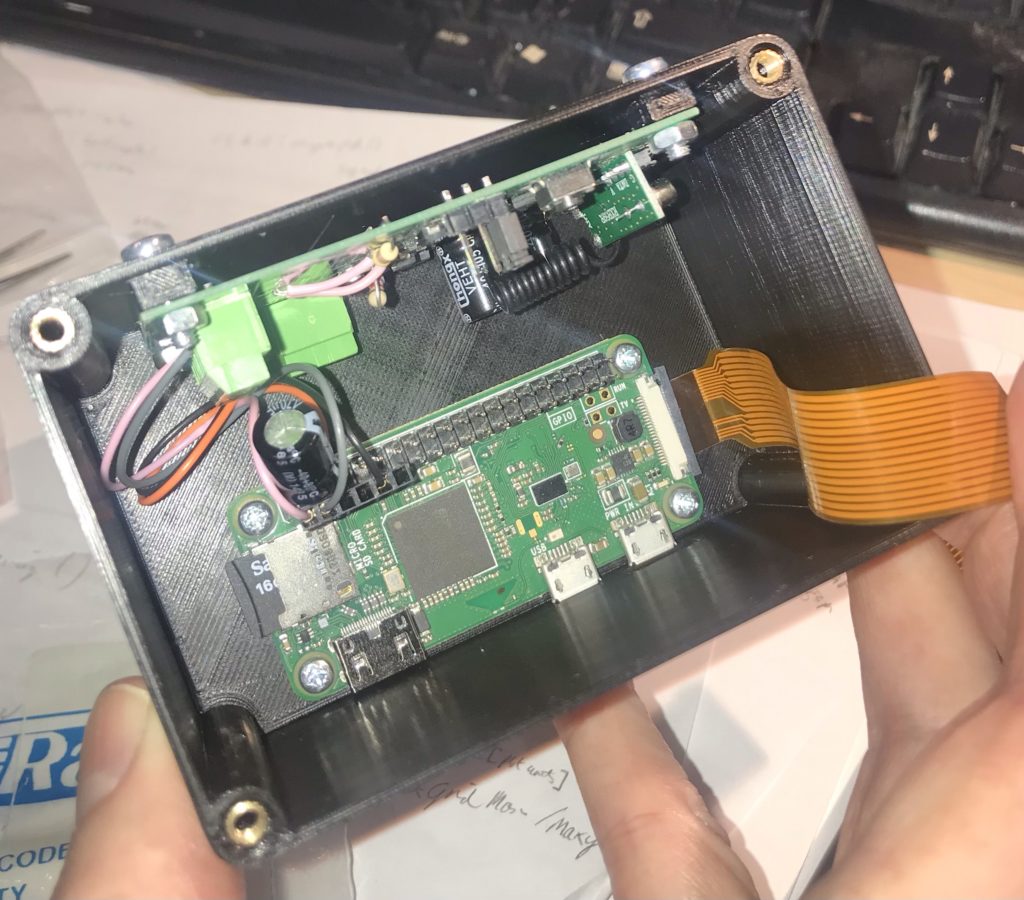 Camera Case – Pi Zero in bottom, Receiver Board on Size, Ribbon Goes to Camera in Lid
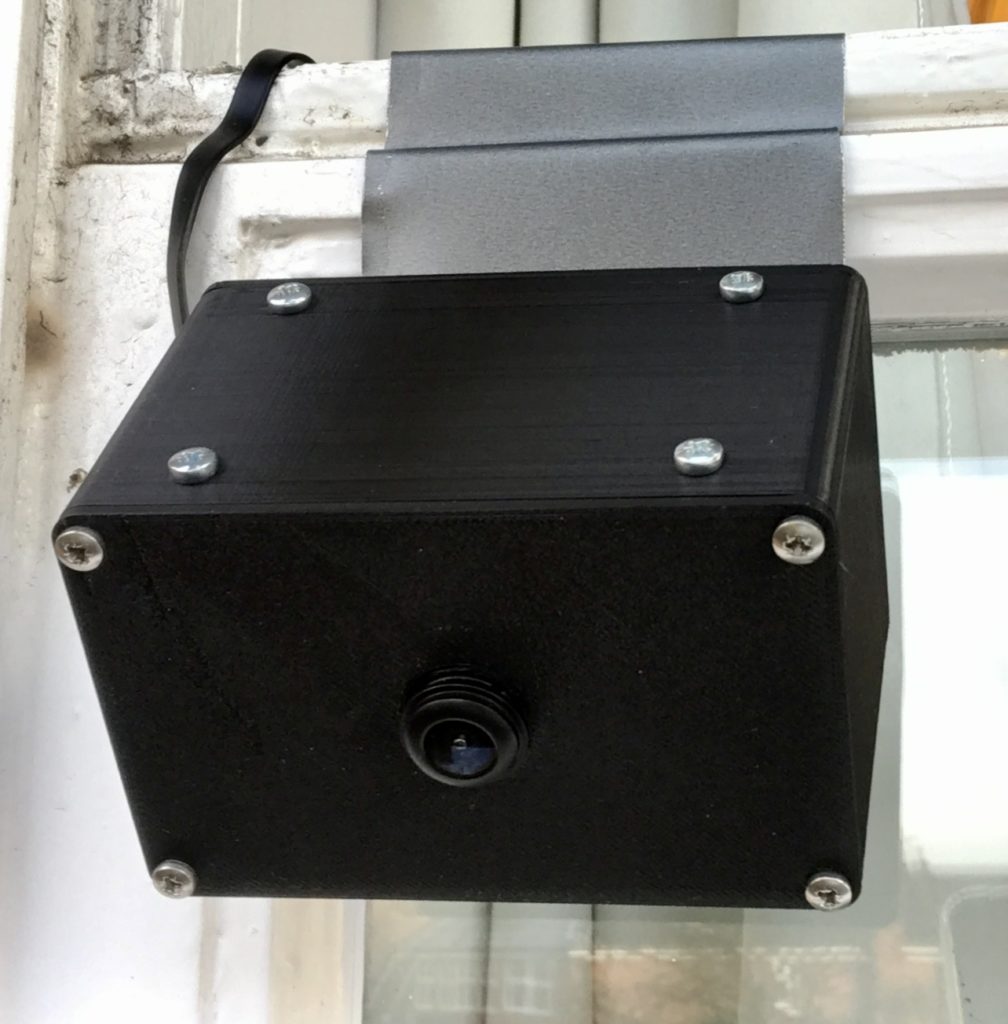 Camera, Pi and Reciver Mounted on Window
I am getting about 8 meters line of sight operational range on the 433MHz signal which is good enough for this application. Since it all went live the only animal to trigger the CATWatch was a squirrel which wandered right in front of it. So, touch wood, it seems that the project to secure the garden against TC is working. Come the spring, I hope the nesting birds appreciate the effort. We wait for TC’s next move!
Of course this project is completely and ridiculously overkill, but the new parts were pretty cheap and it was fun to build. It’s nice to do some back to basics local networking and to have a completely self-contained solution that doesn’t depend on some dubious cloud-based subscription like almost all commercial home automation services do. I can see that there are a lot of other potential applications for simple 433MHz technology which I might want to explore.
(1) A couple of notes on the night vision camera. Firstly, the included IR LEDs for night lighting are pretty feeble. They might light about 2-3 meters, but not further than that. I ended up removing them as they weren’t lighting anything useful when the camera was on an upstairs window. They also cause false positives when it rains due to reflection from raindrops.
The IR LED modules are self-contained (including a light sensor to turn them on) so they could possibly be repurposed as a light source to be used away from the camera. Without IR illumination the camera doesn’t really see in the dark, so I would probably have go for a normal (non-IR) camera if doing this again.
The camera comes with a choice of lenses. Due to breaking one camera I ended up with both lens options. One thing to note is that the lens needs to match the plastic base that it screws in to if it is going to focus properly. If you want to swap lenses on a board you can’t just move the lens over, you also need to move the base.
by Iain at 30 December 2020 11:34 AM
27 November 2020
Martin Raynsford
Low Pressure Air Reservoir for improved cutting.

Being a Hackaday fan and a laser cutter fan, I've been recommended this article about improved laser cutting many times over already. The idea is simple enough, laminar flow from the cutting nozzle appears to improve cutting performance. They don't provide a 3D model and I'm super busy so I employed my newly retired Dad to create one for me. It's a work in progress and I haven't printed it yet, we did find something very interesting along the way though.

My laser cutter has a typically large aquarium pump, it's a bit of a 'puffer' and you can hear the air rushing out of the end of it in puffs, not ideal for laminar flow. Dad suggested a low pressure air reservoir to smooth some of the airflow before it goes into the laser. This really doesn't have to be very complicated and a 2L plastic bottle makes a perfect candidate. I drilled a hole through the cap and the bottom (the two thickest parts of plastic) and wedged the silicon tube into the gaps. The holes are snug and the thing is air tight, a 5 minute hack. The air now coming out of the cone has consistent air flow, and is a great starting point for some laminar flow testing.
I tried cutting some of my dirtiest/smokiest material to see if there was a significant difference. I turned up some power on 2mm Ceiba Plywood (something I've always struggled to cut cleanly) and compared the two results. I've got to admit I can't see much difference yet.


In conclusion, I'm not convinced the air reservoir alone helps to make a better cut. It does however make a significant audible difference, the noise coming from the cutting head is much more constant and certainly quieter. Considering it only took 5 mins to make and cost absolutely nothing to implement it's a worthy addition that's going to live on my cutter from now on.
by noreply@blogger.com (MSRaynsford) at 27 November 2020 02:01 PM
03 September 2020
Martin Raynsford
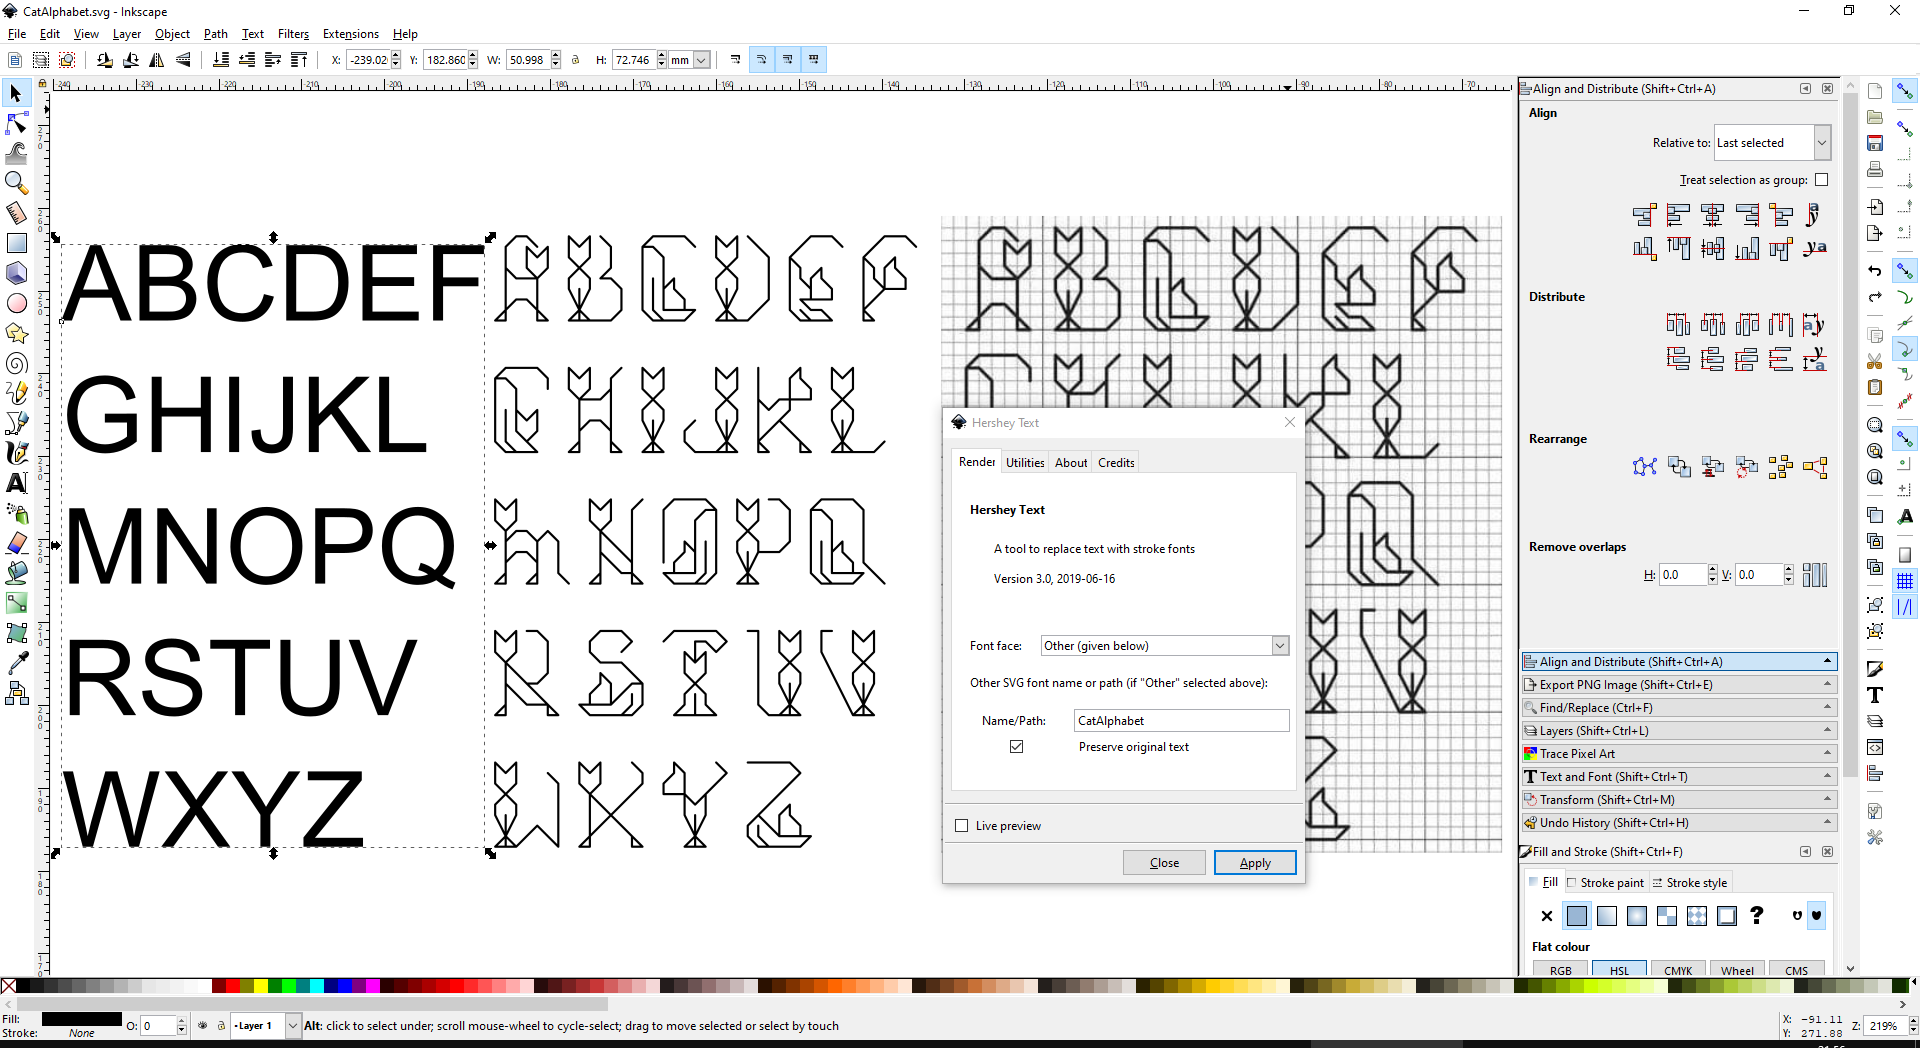
Cat Alphabet and SVG fonts

I saw a picture of a Cat based alphabet which was doing the rounds on social media this morning, I was unable to trace the original source but I thought it was awesome and would lend itself to laser cutting because of it's basic line styling. It also makes a very good exercise in constructing an SVG font so I thought I would write it up.

An SVG font was originally intended as a way of embedding font information inside an SVG document. Icon fonts and SVG fonts are now used widely across the internet due to their ability to store a collection of images within a single file. Each unicode character references a different image and these images can be any drawing you like as defined by the SVG standard.
A traditional font requires a series of filled shapes, the letter 'I' for example would be a filled rectangle. While laser cutting the process of shading that rectangle would be done by engraving, filling it with a series of dots which is very time consuming. An alternate would be to trace the outline of the letter. If a letter is very thin it will look burnt where the laser passes over the same point twice but it also takes twice as long as it needs to. In a traditional font, if the rectangle only has three sides it may not be rendered correctly. SVG fonts do not have this limitation, an image in an SVG font can be any valid path. This means it can be used to hold a font as pure line artwork.

The precedent for for this has already been set in inkscape, Evil Mad Scientist wrote an Inkscape extension many years ago that created line artwork fonts (Hershey Fonts) and they've been updating it ever since. The most recent versions are included in Inkscape by default and have the ability to import any SVG font from the font folder, you simply have to tell it which font to use.
I found creating the SVG font can be a little bit trickier. There are several font generators online but most seem to suffer from, what I would call, traditional font problems. Because the artwork we're trying to include doesn't have closed shapes they don't render correctly and sometimes all the letters are scaled to be the same size; which is not helpful to have 'o' and 'O' the same size. I just discovered that Inkscape also includes an SVG font editor, although I will have to investigate that another time Thankfully the svg font format is well documented and xml is easy to edit with the help of tools such as notepad++.
Each glyph occupies a single line of the file and contains an SVG path as one of the attributes, when called by inkscape, each letter is replaced by the appropriate path from the font file and the whole string is changed into the appropriate line artwork. I have shared the SVG font file over on my github account. (svg here) you simply need to copy is into the svg_fonts folder in the inkscape directory.
There's also a chance to win a free set of tablets over on Twitter now, if you're quick

by noreply@blogger.com (MSRaynsford) at 03 September 2020 09:17 PM
26 August 2020
Martin Raynsford
Japanese Crowdfunding

But don't worry dear reader, this one is legitimate. I was approached by a crowdfunding person to run a Japanese campaign, (understandably a lot of people don't buy from English websites). It seemed like a very sensible proposal and the campaign has nearly run it's full course netting me another 160 puzzles to produce. On one hand I'm sad that it's not more but on the other I was able to launch my campaign without worrying about fulfilling both in time. That's about 10 days work, not bad considering I haven't had to do anything up until this point.
by noreply@blogger.com (MSRaynsford) at 26 August 2020 07:58 PM
21 August 2020
Martin Raynsford
New Puzzle Kickstarter is Funded


by noreply@blogger.com (MSRaynsford) at 21 August 2020 08:20 AM
20 August 2020
Martin Raynsford
New Puzzle Kickstarter is live

https://www.kickstarter.com/projects/msraynsford/the-antikythera-tablets/


by noreply@blogger.com (MSRaynsford) at 20 August 2020 09:21 PM
18 August 2020
Martin Raynsford
New Puzzle set on Kickstarter
Like previous puzzle launches I'm using kickstarter again because of it's reach. Why not follow along and see how well it does, maybe even purchase your own set.

by noreply@blogger.com (MSRaynsford) at 18 August 2020 09:08 AM
18 July 2020
Martin Raynsford
Robot's Return

by noreply@blogger.com (MSRaynsford) at 18 July 2020 10:34 AM
07 July 2020
Martin Raynsford
Knife Box updates


by noreply@blogger.com (MSRaynsford) at 07 July 2020 07:01 PM
03 July 2020
Martin Raynsford
Painted Iron Man


by noreply@blogger.com (MSRaynsford) at 03 July 2020 06:00 PM
01 July 2020
Martin Raynsford
Everyday I'm Shuffling

by noreply@blogger.com (MSRaynsford) at 01 July 2020 06:00 PM
29 June 2020
Martin Raynsford
Z Height Drop


by noreply@blogger.com (MSRaynsford) at 29 June 2020 06:00 PM
27 June 2020
Martin Raynsford
Ear Savers in the Wild

by noreply@blogger.com (MSRaynsford) at 27 June 2020 11:32 PM
Former Vacuum

by noreply@blogger.com (MSRaynsford) at 27 June 2020 10:19 PM
18 May 2020
Martin Raynsford
Pocket Hugs


by noreply@blogger.com (MSRaynsford) at 18 May 2020 07:51 AM
16 May 2020
Martin Raynsford
Abstract Wavy Egg Timelapse


by noreply@blogger.com (MSRaynsford) at 16 May 2020 03:55 PM
14 May 2020
Martin Raynsford
Complex Wavy Egg Timelapse


by noreply@blogger.com (MSRaynsford) at 14 May 2020 12:33 PM
Quick and Cheap Stencils


by noreply@blogger.com (MSRaynsford) at 14 May 2020 11:59 AM
12 May 2020
Martin Raynsford
Simple Wavy Egg Timelapse


by noreply@blogger.com (MSRaynsford) at 12 May 2020 10:00 PM
11 May 2020
Martin Raynsford
Tensegrity Cubes


by noreply@blogger.com (MSRaynsford) at 11 May 2020 08:27 PM